Search

Wednesday, December 7, 2016

OpenVMS VAX Compiler Fun: Hello World in BASIC, BLISS-32, C, C++, COBOL, FORTRAN and PASCAL

OpenVMS VAX Compiler Fun: Hello World in BASIC, C, C++, COBOL, FORTRAN and PASCAL
Beginning of C Compiler Listing file with Machine Code

I just brought up my 2nd SIMH VAX - a VAX-11/780 named CLOUDY with a DECnet address of 1.551. I installed BASIC, C, C++, COBOL, FORTRAN and PASCAL compilers on it one by one, and tested each with a little "Hello, World" derivative.

There is a free public guest account on CLOUDY VAX if you want to write programs in any of these languages. To get to it, telnet to my oldest VAX - a VAXserver 3900 at sanyalnet-openvms-vax.freeddns.org, login to guest account (password is in the SYS$WELCOME banner), and choose the option to SET HOST CLOUDY. You can then login to the guest account on CLOUDY the same way.

BASIC


$ TYPE HELLO_BAS.BAS
10 PRINT "   OpenVMS (TM) VAX Version V7.3     Major version id = 1 Minor version id = 0"

$ BASIC

VAX BASIC V3.9-000

Ready

 Exit
$ BASIC HELLO_BAS.BAS
$ LINK HELLO_BAS.OBJ
$ RUN HELLO_BAS.EXE
   OpenVMS (TM) VAX Version V7.3     Major version id = 1 Minor version id = 0
$

BLISS-32

$ TYPE HELLO_BLISS.BLS
%TITLE 'HELLO_WORLD'
MODULE HELLO_WORLD (IDENT='V1.0', MAIN=HELLO_WORLD,
        ADDRESSING_MODE (EXTERNAL=GENERAL)) =
BEGIN
    LIBRARY 'SYS$LIBRARY:STARLET';
EXTERNAL ROUTINE
        LIB$PUT_OUTPUT;
    GLOBAL ROUTINE HELLO_WORLD =
BEGIN
LIB$PUT_OUTPUT(%ASCID %STRING('Hello World!'))
END;
 END
    ELUDOM
$  TYPE HELLO_BLISS.LIS
                HELLO_WORLD                                      8-Jan-2020 02:08:10    VAX Bliss-32 V4.4-838               Page   1
                                                                 8-Jan-2020 02:06:04    DUA1:[SANYAL.TEMP]HELLO_BLISS.BLS;1      (1)

;   0001  0     %TITLE 'HELLO_WORLD'
;   0002  0     MODULE HELLO_WORLD (IDENT='V1.0', MAIN=HELLO_WORLD,
;   0003  0             ADDRESSING_MODE (EXTERNAL=GENERAL)) =
;   0004  1     BEGIN
;   0005  1         LIBRARY 'SYS$LIBRARY:STARLET';
;   0006  1     EXTERNAL ROUTINE
;   0007  1             LIB$PUT_OUTPUT;
;   0008  1         GLOBAL ROUTINE HELLO_WORLD =
;   0009  2     BEGIN
;   0010  2     LIB$PUT_OUTPUT(%ASCID %STRING('Hello World!'))
;   0011  1     END;


                                                                          .TITLE  HELLO_WORLD HELLO_WORLD
                                                                          .IDENT  \V1.0\

                                                                          .PSECT  $PLIT$,NOWRT,NOEXE,2

            21  64  6C  72  6F  57  20  6F  6C  6C  65  48  00000 P.AAB:  .ASCII  \Hello World!\                              ;
                                                  010E000C  0000C P.AAA:  .LONG   17694732                                    ;
                                                  00000000' 00010         .ADDRESS P.AAB                                      ;

                                                                          .EXTRN  LIB$PUT_OUTPUT

                                                                          .PSECT  $CODE$,NOWRT,2

                                                       0000 00000         .ENTRY  HELLO_WORLD, Save nothing                   ; 0008
                                              0000'  CF  9F 00002         PUSHAB  P.AAA                                       ; 0010
                            00000000G  00            01  FB 00006         CALLS   #1, LIB$PUT_OUTPUT                          ;
                                                         04 0000D         RET                                                 ; 0011

; Routine Size:  14 bytes,    Routine Base:  $CODE$ + 0000


;   0012  1      END
;   0013  0         ELUDOM


;                                      PSECT SUMMARY
;
;       Name                     Bytes                         Attributes
;
;  $PLIT$                              20  NOVEC,NOWRT,  RD ,NOEXE,NOSHR,  LCL,  REL,  CON,NOPIC,ALIGN(2)
;  $CODE$                              14  NOVEC,NOWRT,  RD ,  EXE,NOSHR,  LCL,  REL,  CON,NOPIC,ALIGN(2)


;                               Library Statistics
;
;                                            -------- Symbols --------      Pages       Processing
;       File                                 Total    Loaded   Percent      Mapped      Time
;

HELLO_WORLD     HELLO_WORLD                                      8-Jan-2020 02:08:10    VAX Bliss-32 V4.4-838               Page   2
V1.0                                                             8-Jan-2020 02:06:04    DUA1:[SANYAL.TEMP]HELLO_BLISS.BLS;1      (1)

;  SYS$COMMON:[SYSLIB]STARLET.L32;1          24705         0         0      1450          00:00.1


;                                       COMMAND QUALIFIERS

;       BLISS32/LIST HELLO_BLISS.BLS

; Size:         14 code + 20 data bytes
; Run Time:        00:00.2
; Elapsed Time:    00:00.3
; Lines/CPU Min:    3900
; Lexemes/CPU-Min: 27600
; Memory Used:  51 pages
; Compilation Complete

$ LINK/MAP HELLO_BLISS.OBJ
$ RUN HELLO_BLISS.EXE
Hello World!
$ 

C


$ TYPE HELLO_C.C
#include<stdio.h>
main()
{
        printf("   OpenVMS (TM) VAX Version V7.3     Major version id = 1 Minor version id = 0\n");
}

$ CC/VERSION
Compaq C V6.4-005 on OpenVMS VAX V7.3
$ CC HELLO_C.C
$ LINK HELLO_C.OBJ
$ RUN HELLO_C.EXE
   OpenVMS (TM) VAX Version V7.3     Major version id = 1 Minor version id = 0
$

C++


$ TYPE HELLO_CXX.CXX
#include <iostream>

int main()
{
        cout << "   OpenVMS (TM) VAX Version V7.3     Major version id = 1 Minor version id = 0\n";
}
$ CXX/VERSION
Compaq C++ V5.6-023 on OpenVMS VAX V7.3
$ CXX HELLO_CXX.CXX
$ LINK HELLO_CXX.OBJ
$ RUN HELLO_CXX.EXE
   OpenVMS (TM) VAX Version V7.3     Major version id = 1 Minor version id = 0
$

COBOL


$ TYPE HELLO_COBOL.COB
IDENTIFICATION DIVISION.
PROGRAM-ID. HELLO-WORLD.
* simple hello world program
PROCEDURE DIVISION.
P0.
    DISPLAY '   OpenVMS (TM) VAX Version V7.3     Major version id = 1 Minor version id = 0'.
    STOP RUN.
$ COBOL HELLO_COBOL.COB
$ LINK HELLO_COBOL.OBJ
$ RUN HELLO_COBOL.EXE
   OpenVMS (TM) VAX Version V7.3     Major version id = 1 Minor version id = 0
$

FORTRAN


$ TYPE HELLO_FOR.FOR
      program main
      implicit none
      write ( *, '(a)' ) '   OpenVMS (TM) VAX Version V7.3'
      write ( *, '(a)' ) '   Major version id = 1 Minor version id = 0'
      stop
      end
$ FORTRAN HELLO_FOR.FOR
$ LINK HELLO_FOR.OBJ
$ RUN HELLO_FOR.EXE
  OpenVMS (TM) VAX Version V7.3
  Major version id = 1 Minor version id = 0
FORTRAN STOP
$

PASCAL


$ TYPE HELLO_PAS.PAS
program Hello(output);

begin
  writeln ('   OpenVMS (TM) VAX Version V7.3     Major version id = 1 Minor version id = 0');
end.
$ PASCAL/VERSION
Compaq Pascal V5.8-90 on OpenVMS VAX V7.3
$ PASCAL HELLO_PAS.PAS
$ LINK HELLO_PAS.OBJ
$ RUN HELLO_PAS.EXE
   OpenVMS (TM) VAX Version V7.3     Major version id = 1 Minor version id = 0
$

EXECUTABLE SIZE COMPARISON

Here are the sizes of the executables produced by the different compiler and linker invocations. BASIC and FORTRAN came in with the biggest EXE sizes, while C and Pascal EXEs are the smallest. COBOL and C++ executables are in the middle in terms of executable sizes. I was a bit surprised since I was expecting C++ to come in the biggest.

$ DIR /SIZE HELLO*.EXE

Directory DUA2:[GUEST]

HELLO_BAS.EXE;1            6
HELLO_C.EXE;1              4
HELLO_COBOL.EXE;1          5
HELLO_CXX.EXE;1            5
HELLO_FOR.EXE;1            6
HELLO_PAS.EXE;1            4

Total of 6 files, 30 blocks.
$

DOWNLOAD

You can download all of these source, object and executable files along with source listings including machine code and link map files with cross-reference (excluding BLISS-32 which was added to this post a long time after initial publication)  from my google drive.


Sunday, December 4, 2016

Mitigate OpenVMS Telnet Port Brute Force Intrusion Attacks from Botnets and Humans with Reporting to Blocklist.DE

Introduction

OpenVMS Remote Interactive Breakin Detection - Brute Force Attacks on TELNET port to QCOCAL at http://sanyalnet-openvms-vax.freeddns.org:82/
OpenVMS Remote Interactive Breakin Detection - Brute Force Attacks on TELNET port to QCOCAL

Like owners of every internet-facing DEC VAX server running Digital OpenVMS operating system accessible publicly via the Telnet port (TCP port 23), my pet SIMH VAXserver 3900 "QCOCAL" and SIMH VAX-11/780 "CLOUDY" are inundated with dictionary-based breaking attempts all the time from across the world. You can get a feel of the sheer volume of these attacks from a report I publish daily, generated by a DCL command procedure batch job, summarizing brute-force intrusion attempts at QCOCAL from the OpenVMS system using "ANALYZE/AUDIT/EVENT=(BREAKIN,LOGFAIL)/SINCE=-7-00:00:00 SYS$MANAGER:SECURITY.AUDIT$JOURNAL /output=dua2:[fal$server]intrusions.txt". This summary report is available publicly on the internet, served by WASD httpd web-server running on OpenVMS VAX 7.3, at the URL http://sanyalnet-openvms-vax.freeddns.org:82/falserver/intrusions.txt.

The telnet port intrusion malware problem has recently been exacerbated by the successful Mirai botnet which targets the IoT (Internet of Things ), looking for and installing itself in a mind-boggling number of devices like cameras, smart televisions, routers, switches and other internet-connected consumer and professional devices. The publication of the source code for Mirai has assured public server operators of similar and smarter derivatives continuing to challenge our servers. I publish a frequently-updated publicly available block-list of Mirai (and family) infected IP addresses that my systems are seeing actual brute force break-in attempts from. I use snort IDS/IPS software running on the 2nd of my 3-layer firewall for this. The URL of my Mirai blocklist is http://sanyalnet-cloud-vps.freeddns.org/mirai-ips.txt - feel free to implement a scheduled download of this file to your firewall.

However, the sheer number of sources of attack makes my attempts at denying access to servers based on just a dynamically-updated blacklist of little consequence. I needed something additional, and also wanted to report OpenVMS Telnet port 23 intrusion attempts to the blocklist.de service so that the ISPs of the offenders get notified of abuse, and the numerous users of the blocklist.de list also benefit.

In this post, I describe the rather obtuse way I achieved the goal of passing on intrusion information from OpenVMS logs to blocklist.de using the fail2ban tool running on a Linux intermediary. You can take a look at the results here.

1. Configure a central Unix-style syslog server and secure ssl tunnel for remote logging

One of the things I use my VPS sanyalnet-cloud-vps.freeddns.org located in a data center in Ontario, Canada for is as a central syslog repository which receives and logs entries from most of SANYALnet systems. I get around the issue of clear-text log transmission to the VPS over the internet by using a stunnel secure ssl tunnel at the endpoints. The local rsyslog and syslog-ng loggers forward logs to local stunnel endpoints. stunnel encrypts and transports them to the remote stunnel endpoint running on the remote VPS. The remote stunnel endpoint decrypts the log entries and sends them to the rsyslog daemon running locally on the same remote VPS.

secure remote unix-style central syslog using stunnel

For local servers that run the classic syslog daemon which is incapable of using ports other than the default syslog port (514), I point them to another rsyslog daemon running on a different node dormarth.sanyalnet.lan on the local LAN, which forwards them encrypted over stunnel to the remote unix-style syslog daemon on the VPS. Since stunnel works only for TCP logging, the same rsyslog daemon on the intermediate dormarth.sanyalnet.lan Linux box serves as a UDP syslog sink for UDP-only clients, whose logs are forwarded encrypted over stunnel to the remote cloud VPS.

I use a similar mechanism to forward OpenVMS logs to the central syslog server running on the remote VPS with dormarth.sanyalnet.lan as the intermediary. The flow of log data is OpenVMS OPERATOR LOG > OpenVMS SYSLOGD.EXE > dormarth.sanyalnet.lan > stunnel encryption > sanyalnet-cloud-vps.freeddns.org > stunnel  decryption > rsyslog daemon.

You can learn more about how I have set this up in my blog entry "Secure Remote Logging to Central Log Server Using RSYSLOG on CentOS 6 / CentOS 7 and stunnel".


2. Install and Configure SYSLOGD.EXE on OpenVMS

I slightly-modified the OpenVMS SYSLOG.EXE program by Doug O'Neal from Homewood Academic Computing at Johns Hopkins University to support a configurable port number. This modified SYSLOG.EXE runs on my OpenVMS VAX system QCOCAL, forwarding OPERATOR.LOG entries at real-time to dormarth.sanyalnet.lan, which in turn stunnels them to the remote VPS.

OpenVMS Logging to Unix-Style Linux SYSLOG
The important thing to note for the purposes of this article is the OpenVMS logs are, therefore, recorded by two syslog daemons - one at dormarth.sanyalnet.lan inside the local LAN, and the other at the remote sanyalnet-cloud-vps.freeddns.org VPS.
OpenVMS VAX Unix-Style SYSLOG logging to Linux RSYSLOG on LAN and Secure Tunnel to WAN


I have described OpenVMS to Unix-Style SYSLOG logging in detail in my blog entry "OpenVMS Log Files Remote Logging to Unix/Linux SYSLOG Facility RSYSLOG".


3. Parsing OpenVMS Logs on Linux and Reporting to Blocklist.DE via FAIL2BAN

I wrote a bash shell script "openvms-telnet-spam-blocklist.sh" which I execute periodically (currently every 12 hours) from cron on the intermediate (LAN) syslog server dormarth.sanyalnet.lan. This bash shell script does the following things at each execution:

- Find Remote interactive breakin detection entries logged remotely from the OpenVMS VAX server
- For each breakin atempt found, extract the information into a single line that looks like a Linux PAM authentication failure log entry
- Use the Linux logger to log the PAM auth failure equivalent
- Create a summary report listing the attack sources and details, one per line

Since I already have fail2ban configured on dormarth.sanyalnet.lan, the PAM auth failure entries logged by the bash script are picked up by fail2ban and reported straightaway to blocklist.de. This is ultimately what results in the public recording of the intrusion attempts warning others of the attack source, like you see on the internet abuse IP databases.

The script, listed below, basically looks for log entries in /var/log/messages like this

Dec  4 05:07:01 sanyalnet-vax [OPCOM] %%%%%%%%%%%  OPCOM   4-DEC-2016 05:07:01.97  %%%%%%%%%%%
Dec  4 05:07:01 sanyalnet-vax [OPCOM] Message from user INTERnet on QCOCAL
Dec  4 05:07:01 sanyalnet-vax [OPCOM] TELNET Login from Host: hycoon.lnk.telstra.net Port: 39793
Dec  4 05:07:03 sanyalnet-vax [OPCOM] %%%%%%%%%%%  OPCOM   4-DEC-2016 05:07:03.64  %%%%%%%%%%%
Dec  4 05:07:03 sanyalnet-vax [OPCOM] Message from user AUDIT$SERVER on QCOCAL
Dec  4 05:07:03 sanyalnet-vax [OPCOM] Security alarm (SECURITY) and security audit (SECURITY) on QCOCAL, system id: 1574
Dec  4 05:07:03 sanyalnet-vax [OPCOM] Auditable event:          Remote interactive breakin detection
Dec  4 05:07:03 sanyalnet-vax [OPCOM] Event time:                4-DEC-2016 05:07:03.64
Dec  4 05:07:03 sanyalnet-vax [OPCOM] PID:                      000008F1
Dec  4 05:07:03 sanyalnet-vax [OPCOM] Process name:             _TNA1021:
Dec  4 05:07:03 sanyalnet-vax [OPCOM] Username:                 ROOT
Dec  4 05:07:03 sanyalnet-vax [OPCOM] ort: 39793
Dec  4 05:07:03 sanyalnet-vax [OPCOM] Remote node id:           1174439829
Dec  4 05:07:03 sanyalnet-vax [OPCOM] Remote node fullname:     hycoon.lnk.telstra.net
Dec  4 05:07:03 sanyalnet-vax [OPCOM] Remote username:          TELNET_95870046
Dec  4 05:07:03 sanyalnet-vax [OPCOM] Status:                   %LOGIN-F-NOSUCHUSER, no such user

And writes entries like this into /var/log/secure:

Dec 12 05:59:32 dormarth sshd[000010F1]: pam_unix(sshd:auth): authentication failure; logname=SYS$MANAGER:OPERATOR.LOG uid=0 euid=0 tty=TELNET_50EE4387:49926 ruser=ADMIN rhost=80.238.67.135 user=TELNET_50EE4387 rport=49926 time="12-DEC-2016 05:29:23.07 UTC" event="80-238-67-135.internetia.net.pl;%LOGIN-F-NOSUCHUSER, no such user;Auditable event: Remote interactive breakin detection" reporter="Digital-VAXserver-3900-OpenVMS-7.3;DECnet:QCOCAL(1.550);inet:http://sanyalnet-openvms-vax.freeddns.org:82/"


The offending IP address is reported to blocklist.de by fail2ban, resulting in it being listed in public abuse information, like this:

OpenVMS VAX Telnet Brute-force Intrusion Attack sanyalnet-openvms-vax.freeddns.org at Reported at https://www.abuseipdb.com/check/149.135.0.70
OpenVMS VAX Telnet Brute-force Intrusion Report at www.abuseipdb.com


Here is the bash shell script:


and here is the /etc/cron.d/openvms-telnet-spam-blocklist-update cron file (remember, it must not have write permissions for group and world, i.e. permissions on this file should be -rw-r--r-- ). It is to be noted here that my logrotate.conf file limits the system log to two days of retention, thus automatically limiting the flagged IP addresses to 2 days. And also fail2ban does not re-ban IPs that are already banned, thus avoiding duplicate notifications to blocklist.de within 48-hour periods, which is the default duration of blocklist.de blacklisted IP addresses.

# /etc/cron.d/openvms-telnet-spam-blocklist-update
47 3,15 * * * root nice -n 19 ionice -c3 /root/security/openvms-telnet-spam-blocklist.sh >/var/log/openvms-telnet-spam-blocklist.sh.log 2>&1


Saturday, December 3, 2016

Zero Out Free Disk Space on Virtual Machines and Compact them Before Backup: Solaris, Linux, Windows, OpenVMS

Before taking backups of my hobbyist and production virtual machines, I follow the popular recommendation of zeroing out all unused free virtual hard drive space and compacting them using the virtual disk compacting tool that comes with Oracle Virtualbox.

Download: All the tools, utilities and scripts described in this post are available for direct download from my google drive.

1. Linux


<June 2022 Update>

This script does it all using e4dfrag and zerofree. Get into single-user mode using "telinit 1" and execute a variation of this shell script customized for your Linux partitions. The unmodified script below is for my MX Linux virtual machine that hosts 26 SIMH emulator instances emulating a bunch of VAX and PDP machines, with a disk layout of sda1 for boot+o/s, sda2 for swap, sdb1 for swap and sdc1 for /home.  

</June 2022 Update>


To zero out unused disk space on my virtual hard disks on Linux virtual appliances, I use Ron Yorston's nice "zerofree" tool.

Start off by building zerofree from source and installing it on your Linux VM. The steps are:

# yum -y install e2fsprogs-devel
# wget http://frippery.org/uml/zerofree-1.0.3.tgz
# tar xvzf zerofree-1.0.3.tgz
# cd zerofree-1.0.3
# make
# cp zerofree /usr/sbin/

Here is a screen-log of me executing the above steps in a directory /tmp/x:

[root@sanyalnet-cloud-vps ~]# cd /tmp
[root@sanyalnet-cloud-vps tmp]# mkdir x
[root@sanyalnet-cloud-vps tmp]# cd x
[root@sanyalnet-cloud-vps x]# yum install e2fsprogs-devel -y
Loaded plugins: fastestmirror
Loading mirror speeds from cached hostfile
 * base: centos.mirror.globo.tech
 * epel: mirror.math.princeton.edu
 * extras: centos.mirror.globo.tech
 * updates: centos.mirror.netelligent.ca
Resolving Dependencies
--> Running transaction check
---> Package e2fsprogs-devel.x86_64 0:1.42.9-7.el7 will be installed
--> Finished Dependency Resolution

Dependencies Resolved

================================================================================================================================================
 Package                                 Arch                           Version                              Repository                    Size
================================================================================================================================================
Installing:
 e2fsprogs-devel                         x86_64                         1.42.9-7.el7                         base                          70 k

Transaction Summary
================================================================================================================================================
Install  1 Package

Total download size: 70 k
Installed size: 161 k
Downloading packages:
e2fsprogs-devel-1.42.9-7.el7.x86_64.rpm                                                                                  |  70 kB  00:00:00
Running transaction check
Running transaction test
Transaction test succeeded
Running transaction
  Installing : e2fsprogs-devel-1.42.9-7.el7.x86_64                                                                                          1/1
  Verifying  : e2fsprogs-devel-1.42.9-7.el7.x86_64                                                                                          1/1

Installed:
  e2fsprogs-devel.x86_64 0:1.42.9-7.el7

Complete!
[root@sanyalnet-cloud-vps x]# wget http://frippery.org/uml/zerofree-1.0.3.tgz
--2016-12-04 00:32:03--  http://frippery.org/uml/zerofree-1.0.3.tgz
Resolving frippery.org (frippery.org)... 93.93.131.127, 2a00:1098:0:86:1000::10
Connecting to frippery.org (frippery.org)|93.93.131.127|:80... connected.
HTTP request sent, awaiting response... 200 OK
Length: 8506 (8.3K) [application/x-gzip]
Saving to: ‘zerofree-1.0.3.tgz’

100%[======================================================================================================>] 8,506       --.-K/s   in 0s

2016-12-04 00:32:03 (64.9 MB/s) - ‘zerofree-1.0.3.tgz’ saved [8506/8506]

[root@sanyalnet-cloud-vps x]# tar -zxf zerofree-1.0.3.tgz
[root@sanyalnet-cloud-vps x]# cd zerofree-1.0.3
[root@sanyalnet-cloud-vps zerofree-1.0.3]# make
gcc  -o zerofree zerofree.c -lext2fs
[root@sanyalnet-cloud-vps zerofree-1.0.3]# ls -lrt
total 44
-rw-r--r-- 1 root  root   17921 Aug 12  2007 COPYING
-rw-rw-r-- 1 root  root    3870 Aug  9  2012 zerofree.c
-rw-rw-r-- 1 root  root     109 Aug  9  2012 Makefile
-rwx------ 1 root  root   13353 Dec  4 00:32 zerofree
[root@sanyalnet-cloud-vps zerofree-1.0.3]# which zerofree
/usr/bin/which: no zerofree in (/sbin:/bin:/usr/sbin:/usr/bin)
[root@sanyalnet-cloud-vps zerofree-1.0.3]# cp zerofree /usr/sbin/
[root@sanyalnet-cloud-vps zerofree-1.0.3]# which zerofree
/sbin/zerofree
[root@sanyalnet-cloud-vps zerofree-1.0.3]#

zerofree works only with inactive partitions that are not mounted (it correctly refuses to manipulate mounted active read-write partitions). We need to boot into single-user mode and dismount the partitions one by one, running zerofree on each.

To boot into single-user mode, I edit the grub boot command line to add a "s" at the end. To do this, I reboot the virtual machine, and when it comes back to the grub menu, I press "e" to edit. Note: I am using a CentOS release 6.8 Linux virtual machine (kernel 2.6.32-642.11.1.el6.x86_64) for this walk-through.

grub boot menu - hit "e" to edit the boot command

On the next screen, I choose the "kernel" line by pressing the down arrow, and press "e" again to edit the kernel boot parameters line.

Grub Kernel Boot Parameters Selection - press "e" ti edit

In the minimal line editor that opens up, I add a "s" at the end of the existing line, after "quiet", for single-user boot.

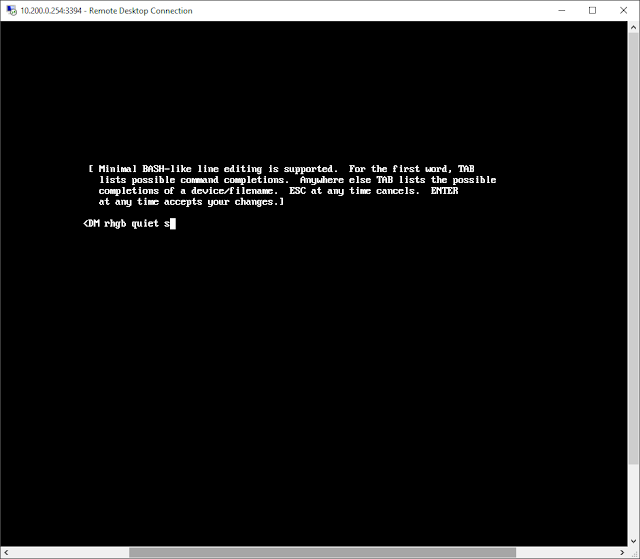
add "s" at end of grub boot command line to boot into single-user mode

Pressing Enter after adding the "s" at the end brings me back to the boot screen, where I can now press "b" to boot into single-user.

after adding "s" to the boot command line, press "b" to boot into single-user

The computer boots up into single-user, and drops me into a root shell.


single user boot - root shell
I type in the "
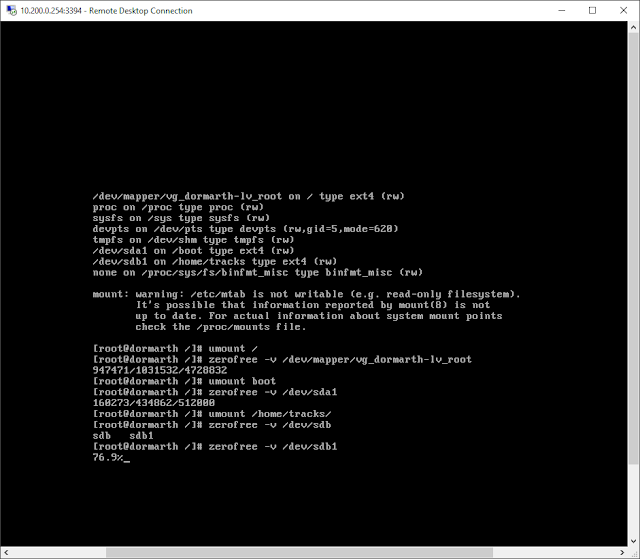
mount" command to look at the mount-points to identify the partitions to run zerofree on.

single-user root shell - mount points and partitions

In this case, there are two disk drives. The first disk, sda, has the logical volume managed (LVM) ext4 file-system "/dev/mapper/vg_dormarth-lv_root" mounted on "/", and the ext4 partition /dev/sda1 mouted at file-system "/boot" . The second disk, sdb, has the /dev/sdb1 partition mounted as the ext4 file-system at /home/tracks.

Therefore, we will dismount each of the following in turn and run zerofree on each dismounted file-system:

  • /dev/mapper/vg_dormarth-lv_root mounted as /
  • /dev/sda1 mounted as /boot
  • /dev/sdb1 mounted as /home/tracks
We start off by unmounting "/" and executing zerofree with the verbose option on /dev/mapper/vg_dormarth-lv_root, using the following commands:

# umount /
# zerofree -v /dev/mapper/vg_dormarth-lv_root mounted

run zerofree on "/" file-system
Continuing on with the other two partitions for zerofree:

# umount /boot
# zerofree -v /dev/sda1
# umount /home/tracks
# zerofree -v /dev/sdb1

zerofree more linux partitons

We have completed running zerofree on the partitions on this Linux virtual appliance, and halt the VM using the halt command:

# halt


The halt command should power the VM appliance off (if it does not, use VirtualBox to power it off). The next step is to invoke the Virtualbox manager to compact (shrink) the virtual disk as described below in section 4.

2. Solaris


On my Solaris 11 openindiana virtual machine (http://sanyal.duckdns.org:81), I use this script which invokes gnu dd to create big files filled with zeroes and deletes them, leaving zeroes on the virtual hard disk.
I then shutdown and poweroff the Solaris 11 openindiana VM and use Virtualbox manager to compact (shrink) the virtual disk as described below in section 4.

3. Microsoft Windows NT, XP, Vista, 7, 8, 10


To write zeroes to unused disk space on Windows, I use the SDELETE.EXE command line tool available for free from Microsoft. You can download the SDELETE.EXE tool by itself, or grab the entire Sysinternals Suite which is a collection of great utilities.

But before zeroing out unused space on a Windows NTFS file-system, I try to free up as much space as I can and defragment/optimize the NTFS partitions, so that the effect of zeroing out empty space is maximized.

I first run the "Disk Cleanup" tool that comes with Windows, choosing the "Cleanup System Files" option that clears up unneeded files freeing up the maximum space.

Microsoft Windows Disk Cleanup

Then I run Microsoft's "Optimize Drive" tool that is also included in Windows to defragment my NTFS partition. This tool (at least on Windows 10) is intelligent in handling SSD drives if you have any (I do not). It makes multiple passes on each NTFS partition you choose, relocating, defragmenting and consolidating in each pass and takes a while. Make sure you defragment all your virtual NTFS drives (C: and D: in this example).

Microsoft Windows NTFS Disk Defragment and Optimize Drive Tool

Lastly I run the SDELETE utility from a Command shell launched as an Administrator (Start -> Search for CMD.EXE -> Right Click on cmd.exe in search results -> Run as Administrator). I use the "-z" option for "Zero free space (good for virtual disk optimization)" and launch the 64-bit version SDELETE64.EXE included in the downloaded zip file since I am using 64-bit Windows 10. I do this for every NTFS drive on my Windows VM, C: and D: drives in the following example.

C:\Program Files\SDelete>sdelete64.exe

SDelete v2.0 - Secure file delete
Copyright (C) 1999-2016 Mark Russinovich
Sysinternals - www.sysinternals.com

usage: sdelete [-p passes] [-r] [-s] [-q] <file or directory> [...]
       sdelete [-p passes] [-z|-c [percent free]] <drive letter [...]>
       sdelete [-p passes] [-z|-c] <physical disk number>
   -c         Clean free space. Specify an option amount of space
              to leave free for use by a running system.
   -p         Specifies number of overwrite passes (default is 1)
   -r         Remove Read-Only attribute
   -s         Recurse subdirectories
   -z         Zero free space (good for virtual disk optimization)
   -nobanner  Do not display the startup banner and copyright message.

Disks must not have any volumes in order to be cleaned.


C:\Program Files\SDelete>sdelete64.exe -z c:

SDelete v2.0 - Secure file delete
Copyright (C) 1999-2016 Mark Russinovich
Sysinternals - www.sysinternals.com

SDelete is set for 1 pass.
Cleaning free space on C:\: 100%
...

C:\Program Files\SDelete>sdelete64.exe -z d:
...
...


Running SDELETE to zero free unused Windows NTFS disk space

Once SDELETE is complete, shut down your Windows VM appliance and proceed to compacting the virtual disks described below in section 5.


4. MS DOS, PC DOS, Windows 3.1, Windows for Workgroups 3.11


For my MS DOS and DOS-based Windows 3.x virtual machines, I use the classic Norton Utilities SPEEDISK and WIPEINFO applications to zerofree usused disk space. Norton Utilities 8.0 for DOS and Windows 3.1 is available from many abandonware archives including here.

As soon as "Starting DOS" appears on booting up, press F5 to bypass processing of the startup files CONFIG.SYS and AUTOEXEC.BAT and get to directly to the DOS prompt. CD to the directory where Norton Utilities is installed (typically C:\NU) and run SPEEDISK with "Full with File Re-Order" optimization option for directories and files.

Supratim Sanyal's Blog: SPEEDISK for MS DOS FAT Windows 3.1 Windows 3.11 WFW ZEROFREE SDELETE free disk space for compacting virtual hard disk drive
Norton Utilities Speedisk MS DOS / Windows 3.1 / Windows 3.11 Disk Defragmenter

Then Run WIPEINFO to zero out unusued disk space. A note of caution: MAKE SURE "Wipe unused areas only" IS CHECKED; OTHERWISE ALL DATA ON THE DRIVE WILL BE LOST!

Here are a couple of screenshots of WIPEINFO in action.

Supratim Sanyal's Blog: SPEEDISK for MS DOS FAT File System Windows 3.1 Windows 3.11 WFW ZEROFREE SDELETE free disk space for compacting virtual hard disk drive

Supratim Sanyal's Blog: SPEEDISK for MS DOS FAT File System Windows 3.1 Windows 3.11 WFW ZEROFREE SDELETE free disk space for compacting virtual hard disk drive

Supratim Sanyal's Blog: SPEEDISK for MS DOS FAT File System Windows 3.1 Windows 3.11 WFW ZEROFREE SDELETE free disk space for compacting virtual hard disk drive

Supratim Sanyal's Blog: SPEEDISK for MS DOS FAT File System Windows 3.1 Windows 3.11 WFW ZEROFREE SDELETE free disk space for compacting virtual hard disk drive
Norton Utilities WIPEINFO for MD DOS virtual disk FAT file system zero free space


When complete, power the VM off. The virtual hard drive is ready for compaction.

For defragmenting, I also sometimes use the PC Tools 2.0 Optimizer utility from "PC Tools - WinShield 2.0" group installed with PC Tools 2.0 for Windows.

Supratim Sanyal's Blog: Defragmenting with PC Tools for Windows 2.0 Drive Optimizer on Windows for Workgroups WFW 3.11 MS DOS FAT File System
PC Tools for Windows 2.0 Drive Optimizer


5. VirtualBox Compact (Shrink) VDI Virtual Hard Disk


Once the unused space on the virtual hard disks has been zeroed out, Shut down the Virtual Machine, power it off completely, and use the Oracle VirtualBox "vboxmanage" tool with the "modifyhd --compact" command on your VDI format virtual hard disk to compact it.

For example,

/usr/bin/vboxmanage modifyhd --compact /home/VirtualMachines/OpenIndiana-Solaris/OpenIndiana-Solaris.vdi


If your virtual hard disk file is not in VDI format, you can create a copy of the virtual disk in VDI format using the clonehd function of vboxmanage, like:

/usr/bin/vboxmanage clonehd vmdisk.vmdk vmdisk.vdi --format VDI

You can then reconfigure your virtual machine to use the VDI format virtual hard-disk file and not use your old vmdk or other format virtual hard disk file any more.

As an example of what the virtual disk compacting procedure achieves, here are the size of the virtual disks before and after compacting of the Linux CentOS 6 VM we ran zerofree on in section 1. The system disk size came down by 6 Gigabytes, from 20GB to 14GB, not a small number.

BEFORE
[root@anubis-mighty-anubis Minecraft and WBRi Stream Server.x64]# ls -l
total 29354028
-r--r--r--. 1 root root   401604608 Apr 13  2015 CentOS-6.6-x86_64-minimal.iso
drwxr-xr-x. 2 root root          94 Nov 21 22:08 Logs
-rw-r--r--. 1 root root 20602421248 Dec  3 16:31 Minecraft and WBRi Stream Server V2 x64 OS Disk.vdi
drwxr-xr-x. 2 root root           6 May  5  2015 Snapshots
-rw-r--r--. 1 root root  9054453760 Dec  3 16:31 WBRiBroadcastMaterial.vdi
-rw-------  1 root root       10589 Oct  3  2015 WBRi_Stream-Minecraft.x64-1.14-linux.vbox
-rw-------  1 root root       10353 Dec  3 16:31 WBRi_Stream-Minecraft.x64.vbox
-rw-------  1 root root       10353 Nov  9 14:10 WBRi_Stream-Minecraft.x64.vbox-prev

EXECUTE COMPACT COMMANDS
[root@anubis-mighty-anubis Minecraft and WBRi Stream Server.x64]# vboxmanage modifyhd --compact Minecraft\ and\ WBRi\ Stream\ Server\ V2\ x64\ OS\ Disk.vdi
0%...10%...20%...30%...40%...50%...60%...70%...80%...90%...100%
[root@anubis-mighty-anubis Minecraft and WBRi Stream Server.x64]# vboxmanage modifyhd --compact WBRiBroadcastMaterial.vdi
0%...10%...20%...30%...40%...50%...60%...70%...80%...90%...100%


AFTER
[root@anubis-mighty-anubis Minecraft and WBRi Stream Server.x64]# ls -l
total 23014440
-r--r--r--. 1 root root   401604608 Apr 13  2015 CentOS-6.6-x86_64-minimal.iso
drwxr-xr-x. 2 root root          94 Nov 21 22:08 Logs
-rw-r--r--. 1 root root 14111735808 Dec  3 16:41 Minecraft and WBRi Stream Server V2 x64 OS Disk.vdi
drwxr-xr-x. 2 root root           6 May  5  2015 Snapshots
-rw-r--r--. 1 root root  9053405184 Dec  3 16:43 WBRiBroadcastMaterial.vdi
-rw-------  1 root root       10589 Oct  3  2015 WBRi_Stream-Minecraft.x64-1.14-linux.vbox
-rw-------  1 root root       10353 Dec  3 16:31 WBRi_Stream-Minecraft.x64.vbox
-rw-------  1 root root       10353 Nov  9 14:10 WBRi_Stream-Minecraft.x64.vbox-prev


6. OpenVMS


I run a VAXserver 3900 and a VAX-11/780 using the SIMH simulator on Linux hosts. Both VAXen run OpenVMS VAX 7.3.

There is no virtual disk compaction tool included with SIMH VAX emulator. However, with the goal of minimizing tarball sizes while taking backups of the OpenVMS systems, I wrote and compiled the following tiny C program which creates a file ZEROFILE.ZERO in the current directory, occupying all available free space on the current disk.

Run the program below on every disk drive, deleting ZEROFILE.ZERO when complete on each drive. This created file must be deleted before the virtual VAXen are shutdown and their SIMH Virtual Machine directory etc. backed up.

After zeroing out empty disk space on my OpenVMS VAX disks, I did see some impact on the tarball size when I backed up the virtual SIMH VAX to a tar-gzipped archive.  The archive size went down from 1,149,655,119 bytes to 1,038,719,403 bytes.

If you want to try ZEROFILE.EXE yourself, download the C source and VAX executable from the FAL SERVER area on my VAXserver 3900 node QCOCAL.


7. OS/2 WARP

OS/2 Warp Logo


For my OS/2 Warp and derivative installations, I installed Borland C++ 2.0 for OS/2 (download) and wrote a few lines of C code to create and delete a file filled with zeroes on the drive whose letter is passed on the command line. I call it zerofree-os2 and the source and binary executable are available for free ownload.


8. Other Systems


A generic approach to zeroing out unused disk space on all Unix-like systems is to simply use the /dev/zero device to read from and dump into a file to fill up unused space, and then delete the file. This method also has the advantage of not bringing the virtual machine down, it can be done on a live system.

I use this approach to zero out unused disk space on my Sophos UTM and pfSense virtual machines.


Sophos UTM


Here's output of the script:

anubis-sophos:/root # nice -n 19 ionice -c3 ./zerofree.sh
+ cd /opt/inst/
+ cat /dev/zero
cat: write error: No space left on device
+ rm -fv zero.delete-me
removed `zero.delete-me'
+ cd /var/storage/
+ cat /dev/zero
cat: write error: No space left on device
+ rm -fv zero.delete-me
removed `zero.delete-me'
+ cd /var/log
+ cat /dev/zero
cat: write error: No space left on device
+ rm -fv zero.delete-me
removed `zero.delete-me'
+ cd /tmp
+ cat /dev/zero
cat: write error: No space left on device
+ rm -fv zero.delete-me
removed `zero.delete-me'
+ cd /
+ cat /dev/zero
cat: write error: No space left on device
+ rm -fv zero.delete-me
removed `zero.delete-me'
+ cd /var/sec
+ cat /dev/zero
cat: write error: No space left on device
+ rm -fv zero.delete-me
removed `zero.delete-me'


pfSense (freeBSD)


On my pfSense open-source router virtual machine, I run this script:


Here is what I get:

[2.3.2-RELEASE][root@anubis-pfsense.sanyalnet.lan]/root: nice -19 ./zerofree.sh
+ cd /
+ cat /dev/zero

/: write failed, filesystem is full
cat: stdout: No space left on device
+ rm -v zero.delete-me
zero.delete-me


Recommended Products from Amazon