
The Grams dark net search engine via my Squid - Privoxy - TOR proxy server with authentication
1. Install, Configure and Launch TOR
For CentOS 7, TOR is easily obtained from the EPEL (Extra Packages for Enterprise Linux) repository. If you do not have the EPEL repo enabled, it can be installed by:
# wget http://dl.fedoraproject.org/pub/epel/7/x86_64/e/epel-release-7-8.noarch.rpm
# rpm -ivh epel-release-7-8.noarch.rpm
Check to see if TOR is accessible from the EPEL repo:
# yum whatprovides tor
Loaded plugins: fastestmirror
Loading mirror speeds from cached hostfile
* base: centos.mirror.vexxhost.com
* epel: ftp.osuosl.org
* extras: centos.mirror.ca.planethoster.net
* updates: mirror.netaddicted.ca
tor-0.2.8.7-1.el7.x86_64 : Anonymizing overlay network for TCP
Repo : epel
Go ahead and install and enable TOR:
# yum install tor
# systemctl enable tor
## Tor opens a SOCKS proxy on port 9050 by default -- even if you don't
## configure one below. Set "SOCKSPort 0" if you plan to run Tor only
## as a relay, and not make any local application connections yourself.
#SOCKSPort 9050 # Default: Bind to localhost:9050 for local connections.
#SOCKSPort 192.168.0.1:9100 # Bind to this address:port too.
SOCKSPort 59050
and the SOCKSPolicy to accept connections from localhost (127.0.0.1) and reject everything else including IPv6:
SOCKSPolicy accept 127.0.0.1
SOCKSPolicy reject *
SOCKSPolicy reject6 *
Log notice syslog
# systemctl start tor
# systemctl -l status tor
● tor.service - Anonymizing overlay network for TCP
Loaded: loaded (/usr/lib/systemd/system/tor.service; enabled; vendor preset: disabled)
Active: active (running) since Thu 2016-10-06 01:32:43 UTC; 21s ago
Process: 30430 ExecStartPre=/usr/bin/tor --runasdaemon 0 --defaults-torrc /usr/share/tor/defaults-torrc -f /etc/tor/torrc --verify-config (code=exited, status=0/SUCCESS)
Main PID: 30438 (tor)
CGroup: /system.slice/tor.service
└─30438 /usr/bin/tor --runasdaemon 0 --defaults-torrc /usr/share/tor/defaults-torrc -f /etc/tor/torrc
Verify TOR is listening to localhost and the port you specified by examining Socks-related entries in syslog:
# grep Socks /var/log/messages
Oct 6 01:32:43 sanyalnet-cloud-vps Tor[30438]: Opening Socks listener on 127.0.0.1:59050
Oct 6 01:32:43 sanyalnet-cloud-vps tor: Oct 06 01:32:43.829 [notice] Opening Socks listener on 127.0.0.1:59050
Also verify TOR has bootstrapped successfully:
# grep Tor /var/log/messages
...
...
Oct 6 01:32:55 sanyalnet-cloud-vps Tor[30438]: Bootstrapped 90%: Establishing a Tor circuit
Oct 6 01:32:55 sanyalnet-cloud-vps Tor[30438]: Tor has successfully opened a circuit. Looks like client functionality is working.
Oct 6 01:32:55 sanyalnet-cloud-vps Tor[30438]: Bootstrapped 100%: Done
TOR is now configured, up and running. Now we go on to provide a proxy for your web traffic to use the TOR network.
2. Install, Configure and Launch Privoxy
"Privoxy is a non-caching web proxy with filtering capabilities for enhancing privacy, manipulating cookies and modifying web page data and HTTP headers before the page is rendered by the browser. Privoxy is a "privacy enhancing proxy", filtering Web pages and removing advertisements. Privoxy can be customized by users, for both stand-alone systems and multi-user networks. Privoxy can be chained to other proxies and is frequently used in combination with Squid and can be used to bypass Internet censorship." - WikipediaThis is exactly we have set out to do!
Download, install and enable Privoxy:
# yum install privoxy
# systemctl enable privoxy
Now edit and make a few simple changes to the main Privoxy configuration file /etc/privoxy/config. Around line 613, un-comment the four helpful debug levels:
debug 1 # Log the destination for each request Privoxy let through. See also debug 1024.
debug 1024 # Actions that are applied to all sites and maybe overruled later on.
debug 4096 # Startup banner and warnings
debug 8192 # Non-fatal errors
Around line 783, change the port that Privoxy listens on from 8118 to 58118, again because I like to use non-default ports for a wee bit of added security. Leave the IP address it listens on to 127.0.0.1 (localhost).
listen-address 127.0.0.1:58118
forward-socks5t / 127.0.0.1:59050 .
forward-socks4 / 127.0.0.1:59050 .
forward-socks4a / 127.0.0.1:59050 .
Save the file and exit the editor, and start up Privoxy:
# systemctl start privoxy
# systemctl status -l privoxy
● privoxy.service - Privoxy Web Proxy With Advanced Filtering Capabilities
Loaded: loaded (/usr/lib/systemd/system/privoxy.service; enabled; vendor preset: disabled)
Active: active (running) since Thu 2016-10-06 02:55:17 UTC; 3s ago
Process: 32276 ExecStart=/usr/sbin/privoxy --pidfile /run/privoxy.pid --user privoxy /etc/privoxy/config (code=exited, status=0/SUCCESS)
Main PID: 32277 (privoxy)
CGroup: /system.slice/privoxy.service
└─32277 /usr/sbin/privoxy --pidfile /run/privoxy.pid --user privoxy /etc/privoxy/config
Oct 06 02:55:16 sanyalnet-cloud-vps.freeddns.org systemd[1]: Starting Privoxy Web Proxy With Advanced Filtering Capabilities...
Oct 06 02:55:17 sanyalnet-cloud-vps.freeddns.org systemd[1]: Started Privoxy Web Proxy With Advanced Filtering Capabilities.
Check the Privoxy log file and verify Privoxy is up and listening to the port we want.
# cat /var/log/privoxy/logfile
2016-10-06 02:55:16.520 7fa896617740 Info: Privoxy version 3.0.26
2016-10-06 02:55:16.520 7fa896617740 Info: Program name: /usr/sbin/privoxy
2016-10-06 02:55:16.520 7fa896617740 Info: Loading filter file: /etc/privoxy/default.filter
2016-10-06 02:55:16.524 7fa896617740 Info: Loading filter file: /etc/privoxy/user.filter
2016-10-06 02:55:16.524 7fa896617740 Info: Loading actions file: /etc/privoxy/match-all.action
2016-10-06 02:55:16.524 7fa896617740 Info: Loading actions file: /etc/privoxy/default.action
2016-10-06 02:55:16.529 7fa896617740 Info: Loading actions file: /etc/privoxy/user.action
2016-10-06 02:55:16.530 7fa896617740 Info: Listening on port 58118 on IP address 127.0.0.1
The third and last piece - authentication for controlled access to your proxy - is provided by Squid proxy which forwards requests to Privoxy which in turn forward them to TOR. We will configure squid on port 8080.
Install the httpd tools that provide authentication tools and Squid proxy, and enable it:
# yum install httpd-tools
# yum install squid
# systemctl enable squid
The primary configuration file for Squid is /etc/squid/squid.conf. Take a backup and replace the contents with the following:
#/etc/squid/squid.conf
ignore_expect_100 on
cache_peer 127.0.0.1 parent 58118 3130 no-query no-digest no-netdb-exchange
prefer_direct off
auth_param basic program /usr/lib64/squid/basic_ncsa_auth /etc/squid/users
auth_param basic children 50
auth_param basic realm Sanyalnet Private Gateway
auth_param basic credentialsttl 2 hours
auth_param basic casesensitive off
acl ncsa_users proxy_auth REQUIRED
acl localhost src 127.0.0.1/32
acl to_localhost dst 127.0.0.0/8 0.0.0.0/32
acl localnet src 10.0.0.0/8 # RFC1918 possible internal network
acl localnet src 172.16.0.0/12 # RFC1918 possible internal network
acl localnet src 192.168.0.0/16 # RFC1918 possible internal network
acl localnet src fc00::/7 # RFC 4193 local private network range
acl localnet src fe80::/10 # RFC 4291 link-local (directly plugged) machines
acl SSL_ports port 443
acl Safe_ports port 80 # http
acl Safe_ports port 21 # ftp
acl Safe_ports port 443 # https
acl Safe_ports port 70 # gopher
acl Safe_ports port 210 # wais
acl Safe_ports port 1025-65535 # unregistered ports
acl Safe_ports port 280 # http-mgmt
acl Safe_ports port 488 # gss-http
acl Safe_ports port 591 # filemaker
acl Safe_ports port 777 # multiling http
acl CONNECT method CONNECT
http_access allow manager localhost
http_access deny manager
http_access deny !Safe_ports
http_access deny CONNECT !SSL_ports
http_access deny to_localhost
http_access allow localnet
http_access allow localhost
http_access allow ncsa_users
http_access deny all
request_header_access Referer deny all
request_header_access X-Forwarded-For deny all
request_header_access Via deny all
request_header_access Cache-Control deny all
forwarded_for off
via off
http_port 8080
hierarchy_stoplist cgi-bin ?
cache_mem 4 MB
coredump_dir /tmp
access_log /var/log/squid/access.log
cache_store_log none
cache_log /var/log/squid/cache.log
pid_filename /var/run/squid.pid
refresh_pattern ^ftp: 1440 20% 10080
refresh_pattern ^gopher: 1440 0% 1440
refresh_pattern -i (/cgi-bin/|\?) 0 0% 0
refresh_pattern . 0 20% 4320
Now we need to create the file /etc/squid/users that contains the username and password to access our proxy chain. In the following, we use for example the username squiduser with password foobar123 - please replace the username and password with something else you want to use to restrict access to your proxy. Note: foobar123 is not displayed on the screen.
# htpasswd -c /etc/squid/users squiduser
New password: foobar123
Re-type new password: foobar123
Adding password for user squiduser
Since Squid does not run from the root account, you need to make the /etc/squid/users file readable by Squid:
# chmod a+r /etc/squid/users
Start Squid up.
# systemctl restart squid;systemctl -l status squid
● squid.service - Squid caching proxy
Loaded: loaded (/usr/lib/systemd/system/squid.service; enabled; vendor preset: disabled)
Active: active (running) since Thu 2016-10-06 04:07:32 UTC; 19ms ago
Process: 5816 ExecStop=/usr/sbin/squid -k shutdown -f $SQUID_CONF (code=exited, status=0/SUCCESS)
Process: 5823 ExecStart=/usr/sbin/squid $SQUID_OPTS -f $SQUID_CONF (code=exited, status=0/SUCCESS)
Process: 5818 ExecStartPre=/usr/libexec/squid/cache_swap.sh (code=exited, status=0/SUCCESS)
Main PID: 5826 (squid)
CGroup: /system.slice/squid.service
├─5826 /usr/sbin/squid -f /etc/squid/squid.conf
└─5828 /usr/sbin/squid -f /etc/squid/squid.conf
Now you can configure your browser to use your proxy at your server IP and port 8080. If everything is working, your browser will ask for the username and password you configured and your subsequent browsing session will be routed through the TOR network.
If like me you have set up a firewall using iptables, you will need to open up port 8080:
# iptables -A INPUT -p tcp -m state --state NEW -m tcp --dport 8080 -j ACCEPT
An easy way to test the setup is by using the Firefox web browser that provides a convenient option to configure a proxy.
Keep a terminal open to watch the squid logs as you test:
# tail -f /var/log/squid/*
Fire up firefox and configure it to use your new proxy from Options -> Advanced -> Network -> Settings as below. Make sure you check the Remote DNS checkbox and fill in the :No Proxy for" box to exclude private IP ranges from forwarding to the Proxy.
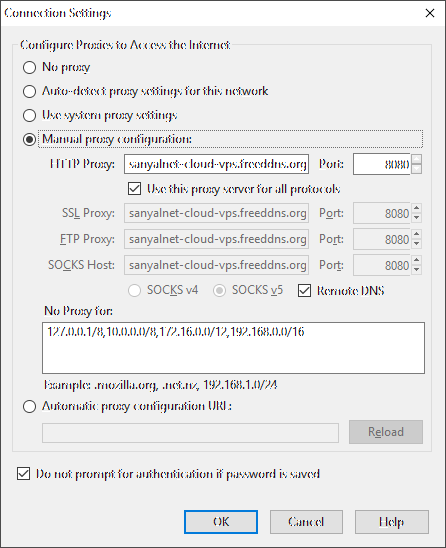
Then type in the URL http://www.whatismyipaddress.com in the address bar. Firefox will connect to your proxy and ask for the username and password you configured on Squid. Check the option to save the proxy authentication username and password so that you do not have to type it in over and over again. When the website comes up, you will see you are coming in to the website via a TOR exit node, at an IP address that is different from the one your NIC has.

# systemctl start privoxy
# systemctl status -l privoxy
● privoxy.service - Privoxy Web Proxy With Advanced Filtering Capabilities
Loaded: loaded (/usr/lib/systemd/system/privoxy.service; enabled; vendor preset: disabled)
Active: active (running) since Thu 2016-10-06 02:55:17 UTC; 3s ago
Process: 32276 ExecStart=/usr/sbin/privoxy --pidfile /run/privoxy.pid --user privoxy /etc/privoxy/config (code=exited, status=0/SUCCESS)
Main PID: 32277 (privoxy)
CGroup: /system.slice/privoxy.service
└─32277 /usr/sbin/privoxy --pidfile /run/privoxy.pid --user privoxy /etc/privoxy/config
Oct 06 02:55:16 sanyalnet-cloud-vps.freeddns.org systemd[1]: Starting Privoxy Web Proxy With Advanced Filtering Capabilities...
Oct 06 02:55:17 sanyalnet-cloud-vps.freeddns.org systemd[1]: Started Privoxy Web Proxy With Advanced Filtering Capabilities.
# cat /var/log/privoxy/logfile
2016-10-06 02:55:16.520 7fa896617740 Info: Privoxy version 3.0.26
2016-10-06 02:55:16.520 7fa896617740 Info: Program name: /usr/sbin/privoxy
2016-10-06 02:55:16.520 7fa896617740 Info: Loading filter file: /etc/privoxy/default.filter
2016-10-06 02:55:16.524 7fa896617740 Info: Loading filter file: /etc/privoxy/user.filter
2016-10-06 02:55:16.524 7fa896617740 Info: Loading actions file: /etc/privoxy/match-all.action
2016-10-06 02:55:16.524 7fa896617740 Info: Loading actions file: /etc/privoxy/default.action
2016-10-06 02:55:16.529 7fa896617740 Info: Loading actions file: /etc/privoxy/user.action
2016-10-06 02:55:16.530 7fa896617740 Info: Listening on port 58118 on IP address 127.0.0.1
3) Install, Configure and Launch SQUID proxy with Authentication
The third and last piece - authentication for controlled access to your proxy - is provided by Squid proxy which forwards requests to Privoxy which in turn forward them to TOR. We will configure squid on port 8080.
Install the httpd tools that provide authentication tools and Squid proxy, and enable it:
# yum install httpd-tools
# yum install squid
# systemctl enable squid
#/etc/squid/squid.conf
ignore_expect_100 on
cache_peer 127.0.0.1 parent 58118 3130 no-query no-digest no-netdb-exchange
prefer_direct off
auth_param basic program /usr/lib64/squid/basic_ncsa_auth /etc/squid/users
auth_param basic children 50
auth_param basic realm Sanyalnet Private Gateway
auth_param basic credentialsttl 2 hours
auth_param basic casesensitive off
acl ncsa_users proxy_auth REQUIRED
acl localhost src 127.0.0.1/32
acl to_localhost dst 127.0.0.0/8 0.0.0.0/32
acl localnet src 10.0.0.0/8 # RFC1918 possible internal network
acl localnet src 172.16.0.0/12 # RFC1918 possible internal network
acl localnet src 192.168.0.0/16 # RFC1918 possible internal network
acl localnet src fc00::/7 # RFC 4193 local private network range
acl localnet src fe80::/10 # RFC 4291 link-local (directly plugged) machines
acl SSL_ports port 443
acl Safe_ports port 80 # http
acl Safe_ports port 21 # ftp
acl Safe_ports port 443 # https
acl Safe_ports port 70 # gopher
acl Safe_ports port 210 # wais
acl Safe_ports port 1025-65535 # unregistered ports
acl Safe_ports port 280 # http-mgmt
acl Safe_ports port 488 # gss-http
acl Safe_ports port 591 # filemaker
acl Safe_ports port 777 # multiling http
acl CONNECT method CONNECT
http_access allow manager localhost
http_access deny manager
http_access deny !Safe_ports
http_access deny CONNECT !SSL_ports
http_access deny to_localhost
http_access allow localnet
http_access allow localhost
http_access allow ncsa_users
http_access deny all
request_header_access Referer deny all
request_header_access X-Forwarded-For deny all
request_header_access Via deny all
request_header_access Cache-Control deny all
forwarded_for off
via off
http_port 8080
hierarchy_stoplist cgi-bin ?
cache_mem 4 MB
coredump_dir /tmp
access_log /var/log/squid/access.log
cache_store_log none
cache_log /var/log/squid/cache.log
pid_filename /var/run/squid.pid
refresh_pattern ^ftp: 1440 20% 10080
refresh_pattern ^gopher: 1440 0% 1440
refresh_pattern -i (/cgi-bin/|\?) 0 0% 0
refresh_pattern . 0 20% 4320
Now we need to create the file /etc/squid/users that contains the username and password to access our proxy chain. In the following, we use for example the username squiduser with password foobar123 - please replace the username and password with something else you want to use to restrict access to your proxy. Note: foobar123 is not displayed on the screen.
# htpasswd -c /etc/squid/users squiduser
New password: foobar123
Re-type new password: foobar123
Adding password for user squiduser
# chmod a+r /etc/squid/users
Start Squid up.
# systemctl restart squid;systemctl -l status squid
● squid.service - Squid caching proxy
Loaded: loaded (/usr/lib/systemd/system/squid.service; enabled; vendor preset: disabled)
Active: active (running) since Thu 2016-10-06 04:07:32 UTC; 19ms ago
Process: 5816 ExecStop=/usr/sbin/squid -k shutdown -f $SQUID_CONF (code=exited, status=0/SUCCESS)
Process: 5823 ExecStart=/usr/sbin/squid $SQUID_OPTS -f $SQUID_CONF (code=exited, status=0/SUCCESS)
Process: 5818 ExecStartPre=/usr/libexec/squid/cache_swap.sh (code=exited, status=0/SUCCESS)
Main PID: 5826 (squid)
CGroup: /system.slice/squid.service
├─5826 /usr/sbin/squid -f /etc/squid/squid.conf
└─5828 /usr/sbin/squid -f /etc/squid/squid.conf
Now you can configure your browser to use your proxy at your server IP and port 8080. If everything is working, your browser will ask for the username and password you configured and your subsequent browsing session will be routed through the TOR network.
If like me you have set up a firewall using iptables, you will need to open up port 8080:
# iptables -A INPUT -p tcp -m state --state NEW -m tcp --dport 8080 -j ACCEPT
To make the iptables rule permanent, add it to /etc/sysconfig/iptables. Mine looks like this (with all rules on my VPS, not just for the proxy):
# cat /etc/sysconfig/iptables
# fail2ban and ip blocklist script adds entries after boot, extending this default filter rules
*filter
:INPUT ACCEPT [341:22721]
:FORWARD ACCEPT [0:0]
:OUTPUT ACCEPT [201:20785]
# (Tuklu) Basic Network Exploit Protection from syn flood, nul, christmas and fragmented packets
-A INPUT -p tcp -m tcp ! --tcp-flags FIN,SYN,RST,ACK SYN -m state --state NEW -j DROP
-A INPUT -p tcp -m tcp --tcp-flags FIN,SYN,RST,PSH,ACK,URG FIN,SYN,RST,PSH,ACK,URG -j DROP
-A INPUT -p tcp -m tcp --tcp-flags FIN,SYN,RST,PSH,ACK,URG NONE -j DROP
-A INPUT -f -j DROP
# (Tuklu) Accept connections on these ports
-A INPUT -m state --state RELATED,ESTABLISHED -j ACCEPT
-A INPUT -i lo -j ACCEPT
-A OUTPUT -o lo -j ACCEPT
-A INPUT -p tcp -m state --state NEW -m tcp --dport 22 -j ACCEPT
-A INPUT -p tcp -m state --state NEW -m tcp --dport 23 -j ACCEPT
-A INPUT -p tcp -m state --state NEW -m tcp --dport 25 -j ACCEPT
-A INPUT -p tcp -m state --state NEW -m tcp --dport 53 -j ACCEPT
-A INPUT -p udp -m udp --dport 53 -j ACCEPT
-A INPUT -p tcp -m state --state NEW -m tcp --dport 80 -j ACCEPT
-A INPUT -p tcp -m state --state NEW -m tcp --dport 110 -j ACCEPT
-A INPUT -p udp -m udp --dport 123 -j ACCEPT
-A INPUT -p tcp -m state --state NEW -m tcp --dport 143 -j ACCEPT
-A INPUT -p tcp -m state --state NEW -m tcp --dport 443 -j ACCEPT
-A INPUT -p tcp -m state --state NEW -m tcp --dport 465 -j ACCEPT
-A INPUT -p tcp -m state --state NEW -m tcp --dport 587 -j ACCEPT
-A INPUT -p tcp -m state --state NEW -m tcp --dport 993 -j ACCEPT
-A INPUT -p tcp -m state --state NEW -m tcp --dport 995 -j ACCEPT
-A INPUT -p tcp -m state --state NEW -m tcp --dport 4190 -j ACCEPT
-A INPUT -p tcp -m state --state NEW -m tcp --dport 8080 -j ACCEPT
-A INPUT -j REJECT --reject-with icmp-host-prohibited
-A FORWARD -j REJECT --reject-with icmp-host-prohibited
COMMIT
4) Test the Squid - Privoxy - TOR proxy chain
An easy way to test the setup is by using the Firefox web browser that provides a convenient option to configure a proxy.
Keep a terminal open to watch the squid logs as you test:
# tail -f /var/log/squid/*
Fire up firefox and configure it to use your new proxy from Options -> Advanced -> Network -> Settings as below. Make sure you check the Remote DNS checkbox and fill in the :No Proxy for" box to exclude private IP ranges from forwarding to the Proxy.

Then type in the URL http://www.whatismyipaddress.com in the address bar. Firefox will connect to your proxy and ask for the username and password you configured on Squid. Check the option to save the proxy authentication username and password so that you do not have to type it in over and over again. When the website comes up, you will see you are coming in to the website via a TOR exit node, at an IP address that is different from the one your NIC has.

5) Visit the Darknet
You can now visit some websites on the dar knet - domains that end with .onion which are not accessible from outside the TOR network. Here are some things to try out.- FindOnions - find interesting dark net sites: http://findonzsenaqmtof.onion
- Hidden Wiki - Tor Wiki - Onion Links Directory: http://wikitjerrta4qgz4.onion/
- Do a Grams search (Grams is the equivalent of google for the dark net): http://grams7enufi7jmdl.onion/
- Your information may be on sale on The RealDeal dark net marketplace: http://trdealmgn4uvm42g.onion/users...
- Visit the Marketplace Forum: http://illartcatdwduxtc.onion
No comments:
Post a Comment
"SEO" link builders: move on, your spam link will not get posted.
Note: Only a member of this blog may post a comment.