Search

Tuesday, November 13, 2018

Fun with OpenBSD for SPARC64 | High-Security O/S on 64-bit Sun UltraSPARC using QEMU Sun4U and User-mode Networking Back-End

Supratim Sanyal's Blog: Sun UltraSPARC 1
Sun Microsystems UltraSPARC 1
Image courtesy: oldcomputers.info

Supratim Sanyal's Blog: OpenBSD Logo
OpenBSD is among the few operating systems available today (along with the best O/S ever - Digital OpenVMS of course!) for the paranoid that can be the basis of installations requiring bullet-proof security. The official OpenBSD website says, "Only two remote holes in the default install, in a heck of a long time!". Given OpenBSD was released in 1995, the "heck of a long time" is 23 years. The first of the two holes was a OpenSSH vulnerability in 2002 that affected all operating systems using OpenSSH.. The second one, CVE-2007-1365 discovered eleven years ago, involved ICMP6 packets in OpenBSD's IPv6 implementation.

The versatile QEMU emulator project has matured enough to include stable emulation of the Sun-4U featuring SPARC V9 64-bit processor architecture. I took the opportunity to try out OpenBSD release 6.4 for SPARC64 using qemu-system-sparc64 hypervisor on OpenSUSE Tumbleweed running in a Oracle Virtualbox on CentOS 7 on a DELL PowerEdge R-710.

The OpenBSD installer ISO CD image (install64.iso)  was the fastest distribution download I have experienced yet, perhaps due to hosting on Cloudflare CDN.

A QEMU qcow2-format 4GB disk image was created using:

$ qemu-img create -f qcow2 -o size=4G openbsd-sparc-disk-1.4gb.disk

The downloaded install64.iso OpenBSD installer CD image was renamed for better identification to openbsd-sparc-install64.iso and QEMU SPARC-64 emulator fired up for installation:

LC_ALL=C QEMU_AUDIO_DRV=none \
qemu-system-sparc64 \
        -machine sun4u,usb=off \
        -realtime mlock=off \
        -smp 1,sockets=1,cores=1,threads=1 \
        -rtc base=utc \
        -m 1024 \
        -boot d \
        -drive file=openbsd-sparc-disk-1.4gb.disk,if=none,id=drive-ide0-0-1,format=qcow2,cache=none \
        -cdrom openbsd-sparc-install64.iso \
        -device ide-hd,bus=ide.0,unit=0,drive=drive-ide0-0-1,id=ide0-0-1 \
        -msg timestamp=on \
        -serial pty -nographic \
        -net nic,model=ne2k_pci -net user \
        -monitor stdio

"-boot d" boots the virtual Sun4U from the CD-ROM image. Also, "-net nic,model=ne2k_pci -net user" is the only QEMU networking model that works for the QEMU sparc64 hypervisor at this time; neither the tap nor the VDE (Virtual Distributed Ethernet) back-ends could establish network connection from the virtual machine successfully. The tap networking back-end caused a kernel panic and crashed the VM after a few pings went through to the internet. The VDE back-end did not cause a system crash, but did not provide a network connection at all either.  The two attempted and failed networking back-end parameters in the qemu command line were:

-net nic,model=ne2k_pci -net tap,ifname=inettap0,script=no,downscript=no
-net nic,model=ne2k_pci -net vde,sock=/tmp/vde-ip.ctl


QEMU launched successfully with the console connected to a virtual serial port that it identified:

QEMU 3.0.0 monitor - type 'help' for more information
(qemu) qemu-system-sparc64: -serial pty: char device redirected to /dev/pts/5 (label serial0)

On another host (OpenSUSE) terminal, the "minicom" serial port communications tool was used to connect to the Sun4U virtual console serial port (/dev/pts/5 in the above example). The first screen of the installer was displayed after the virtual SPARCstation booted up:


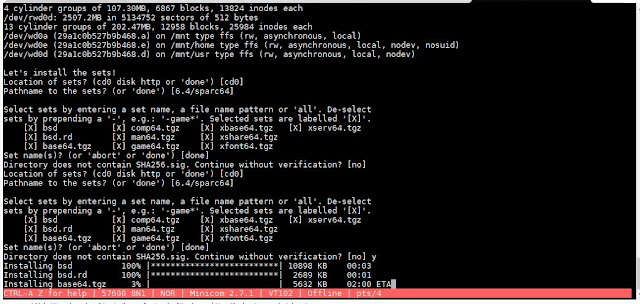
Supratim Sanyal's Blog: IInstalling OpenBSD SPARC 64-bit for Sun UltraSPARC using QEMU in SANYALnet Labs - Installation Screen #1\

Installation proceeded with no surprises.

Supratim Sanyal's Blog: IInstalling OpenBSD SPARC 64-bit for Sun UltraSPARC using QEMU in SANYALnet Labs - Installation Screen #2

Supratim Sanyal's Blog: IInstalling OpenBSD SPARC 64-bit for Sun UltraSPARC using QEMU in SANYALnet Labs - Installation Screen #3

Eventually installation completed successfully. The machine was then halted and QEMU stopped by entering "quit" at the "(qemu)" prompt.


Supratim Sanyal's Blog: IInstalling OpenBSD SPARC 64-bit for Sun UltraSPARC using QEMU in SANYALnet Labs - Installation Screen #4

QEMU was then launched again, this time with "-boot c" option to boot from the hard disk instead of the CD-ROM image:

LC_ALL=C QEMU_AUDIO_DRV=none \
qemu-system-sparc64 \
        -machine sun4u,usb=off \
        -realtime mlock=off \
        -smp 1,sockets=1,cores=1,threads=1 \
        -rtc base=utc \
        -m 1024 \
        -boot c \
        -drive file=openbsd-sparc-disk-1.4gb.disk,if=none,id=drive-ide0-0-1,format=qcow2,cache=none \
        -cdrom openbsd-sparc-install64.iso \
        -device ide-hd,bus=ide.0,unit=0,drive=drive-ide0-0-1,id=ide0-0-1 \
        -msg timestamp=on \
        -serial pty -nographic \
        -net nic,model=ne2k_pci -net user \
        -monitor stdio

The virtual SPARCstation booted up finefrom the hard-disk. At the "root device:" prompt, the device "wd0a" was provided. The default for the swap and dump devices were chosen.

Supratim Sanyal's Blog: IInstalling OpenBSD SPARC 64-bit for Sun UltraSPARC using QEMU in SANYALnet Labs - Installation Screen #5

Supratim Sanyal's Blog: IInstalling OpenBSD SPARC 64-bit for Sun UltraSPARC using QEMU in SANYALnet Labs - Installation Screen #6

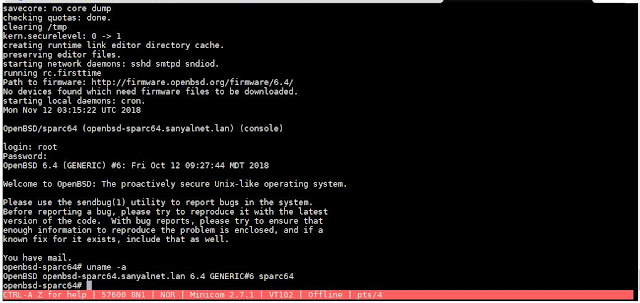
Eventually the logon prompt was displayed.

Supratim Sanyal's Blog: IInstalling OpenBSD SPARC 64-bit for Sun UltraSPARC using QEMU in SANYALnet Labs - Installation Screen #6

OpenBSD comes with C and C++ compilers. It also provides a graphical X Windows environment; it should be possible to set up routing so that the user-mode network back-end forwards X windows data to an external X server for the display (QEMU SPARC 64 emulator does not support graphics yet).

Supratim Sanyal's Blog: IInstalling OpenBSD SPARC 64-bit for Sun UltraSPARC using QEMU in SANYALnet Labs - Installation Screen #7

Supratim Sanyal's Blog: IInstalling OpenBSD SPARC 64-bit for Sun UltraSPARC using QEMU in SANYALnet Labs - Installation Screen #8

DOWNLOAD

The QEMU OpenBSD SPARC 64-bit virtual machine can be downloaded from my google drive. The root password of the virtual QEMU Sun4u is "password".


Wednesday, November 7, 2018

Adding a Couple of World's Biggest and Most Expensive Hard Drives: IBM 3390 DASD on S/390 Mainframe

IBM 3390 hard drives - direct access storage device
IBM 3390 direct access storage device
Picture courtesy: IBM


So I added a couple of the world's biggest and most expensive disk drives to IBM S/390 z/Architecture mainframe running Ubuntu 18 Linux. In real life, this would have set me back by almost half a million dollars in today's money. Fortunately, I actually spent $0.00 thanks to the rock-solid Hercules-emulated IBM S/390 running Ubuntu Linux 18.

Adding new storage to big-iron is a bit different from adding SCSI or IDE disks to more familiar computers! This post chronicles the steps.


On the host running Hercules, create the virtual disk image file using the dasdinit tool (part of Hercules); new DASD device with device-number 0122:

dasdinit -z -linux ./dasd/ubuntu-s390x.0122.disk 3390-3 0x0122 3200


Edit the Hercules configuration file and add the new dasd image filename for the new device number:

# .-----------------------Device number
# |     .-----------------Device type
# |     |       .---------File name and parameters
# |     |       |
# V     V       V
#---    ----    --------------------

# Display Terminals
0700 3270
0701 3270

# dasd
0120 3390 ./dasd/ubuntu-s390x.0120.disk
0121 3390 ./dasd/ubuntu-s390x.0121.disk
0122 3390 ./dasd/ubuntu-s390x.0122.disk


Then start Hercules and log into the emulated Ubuntu s390x as root.

Make sure Ububtu sees the new drive (although it is not available for use yet). Check for the device number in the output of the lszdev command:

root@s390x:~# lszdev
Reading device information: 100.0% (7/7)
TYPE         ID                 ON   PERS  NAMES
dasd-eckd    0.0.0120           yes  yes   dasda
dasd-eckd    0.0.0121           yes  yes   dasdb
dasd-eckd    0.0.0122           no   no
ctc          0.0.0a00:0.0.0a01  yes  yes   slca00
generic-ccw  0.0.0700           no   no
generic-ccw  0.0.0701           no   no

To activate the new  drive, use the chzdev command and verify with lszdev again:

root@s390x:~# chzdev -e 0122
ECKD DASD 0.0.0122 configured

root@s390x:~# lszdev
Reading device information: 100.0% (7/7)
TYPE         ID                 ON   PERS  NAMES
dasd-eckd    0.0.0120           yes  yes   dasda
dasd-eckd    0.0.0121           yes  yes   dasdb
dasd-eckd    0.0.0122           yes  yes   dasdc
ctc          0.0.0a00:0.0.0a01  yes  yes   slca00
generic-ccw  0.0.0700           no   no
generic-ccw  0.0.0701           no   no

Also use the lsdasd command to see the new drive in the list of drives:

root@s390x:~# lsdasd
Bus-ID     Status      Name      Device  Type  BlkSz  Size      Blocks
==============================================================================
0.0.0120   active      dasda     94:0    ECKD  4096   2347MB    601020
0.0.0121   active      dasdb     94:4    ECKD  4096   1125MB    288000
0.0.0122   active      dasdc     94:8    ECKD  4096   2250MB    576000

At this point, the new uninitialized drive is available with the Linux device name dasdc. As usual, we partition the drive, but using the special fdasd tools (not fdisk). For my case, I just created one big partition spanning the entire drive.

root@s390x:~# fdasd /dev/dasdc
reading volume label ..: VOL1
reading vtoc ..........: ok

Command action
   m   print this menu
   p   print the partition table
   n   add a new partition
   d   delete a partition
   l   list known partition types
   v   change volume serial
   t   change partition type
   r   re-create VTOC and delete all partitions
   u   re-create VTOC re-using existing partition sizes
   s   show mapping (partition number - data set name)
   q   quit without saving changes
   w   write table to disk and exit

Command (m for help): v
Please specify new volume serial (6 characters).
current     : 0X0122
new [0X0122]:

volume identifier changed to '0X0122'

Command (m for help): n
First track (1 track = 48 KByte) ([2]-47999):
Using default value 2
Last track or +size[c|k|m|g] (2-[47999]):
Using default value 47999

Command (m for help): p

Disk /dev/dasdc:
  cylinders ............: 3200
  tracks per cylinder ..: 15
  blocks per track .....: 12
  bytes per block ......: 4096
  volume label .........: VOL1
  volume serial ........: 0X0122
  max partitions .......: 3

 ------------------------------- tracks -------------------------------
               Device      start      end   length   Id  System
          /dev/dasdc1          2    47999    47998    1  Linux native

Command (m for help): w
writing volume label...
writing VTOC...
rereading partition table...


Now at last a familiar command to format the partition with ext4 file system:

root@s390x:~# mkfs.ext4 -t small /dev/dasdc1
mke2fs 1.44.1 (24-Mar-2018)
Creating filesystem with 575976 4k blocks and 576000 inodes
Filesystem UUID: a0010741-a0f4-4465-9629-6fd9a32a2bbc
Superblock backups stored on blocks:
        32768, 98304, 163840, 229376, 294912

Allocating group tables: done
Writing inode tables: done
Writing superblocks and filesystem accounting information: done

The new DASD volume is now ready for use, and can be mounted to a suitable mount-point, or for automatic mounting at boot, to /etc/fstab.

root@s390x:/# mount /dev/dasdc1 /mnt

Many thanks to Frank's post for these steps.

Recommended Products from Amazon