Search

Sunday, September 24, 2017

The DECnet-Linux Experience: It Works!

Supratim Sanyal's Blog: DECnet Linux Communication Between two Linux nodes
Ubuntu 14.04 Linux Twins FEDACH (1.553) and FOMFOR (1.554) Talk over DECnet
I was aware of an implementation of the DECnet Phase IV network protocol on the Linux kernel for quite a while now, and recently decided to take the plunge and give it a shot, with additional motivation from this inspiring Retrocomp post.

It was not going well initially because of a bad call I made to try to install ancient releases of Linux distributions from Debian and Fedora from around the time DECnet-Linux was first announced. As a result, I spent many sleepless nights trying to find the packages and dependencies for Linux distros featuring DECnet from the first few years of the new millennium.

Eventually I did what I should have started off with: check if modern Linux distributions still include DECnet-Linux. A search of the kernel of the bleeding-edge Ubuntu 17 "Zesty Zapus" looked promising; DECnet-Linux was indeed compiled right into Ubuntu 17's mainline 4.10 kernel build and the required libdnet, dnet-common and dnprogs packages were available for Ubuntu 17.

Unfortunately, Ubuntu 17's support for DECnet-Linux turned out to be dysfunctional. I created two virtual machines with Ubuntu 17 and installed the DECnet tools, but could not get any farther than the dneigh command showing the other node. FAL, Phone, sethost, etc. would simply not work and would sometimes lock up the virtual machines.

Frustrated, I posted the question to the fabulous folks at the comp.os.vms newgroup. Within a day, I had a path forward; it was clear from John E. Malmberg and "hb" that I needed to try Ubuntu 14.04 or earlier; DECnet-Linux was definitely broken after Ubuntu 14.04.

Re-energized, I proceeded to install the 32-bit release of Ubuntu 14.04.5 LTS (Trusty Tahr) on two virtual machines using the lightweight lubuntu flavor from the Desktop ISO CD image. Then apt-get install dnprogs brought in everything I needed to get DECnet-linux mostly up (the official Ubuntu 14 repositories still work at the time of writing, no need to look for mysterious archives of no-longer supported releases yet.)

However, I still had to make a couple of little tweaks to have DECnet-Linux work all the way. Here are the things I did over and after the default install of DECnet-Linux from Ubuntu 14.04 repositories.

1. The official dnprogs and family of packages from Ubuntu 14.04 repos installed versions of /usr/sbin/dnetnml and /usr/sbin/ctermd that did not work well. The dnetnml program was not responding correctly by showing executor, line, or circuit etc. characteristics when requested by other nodes. Also, attempts to SET HOST from other nodes resulted in the official ctermd program to look for a non-existent local "pty" device and fail.

To get around these problems, I downloaded the source code tarball dnprogs_2.62.tar.gz which is available in practically all Ubuntu 14 mirrors including here. I then built the entire DECnet program suite locally, and then replaced the /usr/sbin/dnetnml and /usr/sbin/ctermd binaries with the ones built locally from source.

2. The official dnprogs installation was not filling in the correct DECnet node-name and address in the files /proc/sys/net/decnet/node_name and /proc/sys/net/decnet/node_address; these file always had "???" and 0.0 despite the correct DECnet executor address being defined in /etc/decnet.conf configuration file. This was resulting in some strange behavior indicating DECnet/Linux was not using the adjacent router node to reach nodes outside the local network, but trying to access them directly and failing. I added simple commands in the /etc/rc.local file (and made it executable and exit with 0) to force the correct DECnet node-name and DECnet address:

# -- rc.local DECnet kludge - /proc/sys/net/decnet/node_name has ???; force it
echo FOMFOR > /proc/sys/net/decnet/node_name
# -- rc.local DECnet kludge - /proc/sys/net/decnet/node_address has 0.0; force it
echo 1.554 > /proc/sys/net/decnet/node_address
# --

3. In an attempt to control "DECnet event 4.3, oversized packet loss" errors when accessing the FAL server on DECnet-linux from remote nodes, I forced the MTU of the DECnet NIC (eth1 in my case) to 576 by adding "mtu 576" to /etc/network/interfaces. I am not sure this actually helps in controlling the error. Here are the corresponding sections of /etc/network/interfaces:

FEDACH

# DECnet 1.553
auto eth1
iface eth1 inet manual
    # MAC address corresponding to DECnet Address
    hwaddress ether aa:00:04:00:29:06
    # Brave attempt to avoid sporadic errors on router node like the following:
    # "DECnet event 4.3, oversized packet loss"
    mtu 576

FOMFOR

# DECnet 1.554
auto eth1
iface eth1 inet manual
    # MAC address corresponding to DECnet Address
    hwaddress ether aa:00:04:00:2a:06
    # Brave attempt to avoid sporadic errors on router node like the following:
    # "DECnet event 4.3, oversized packet loss"
    mtu 576

My two Ubuntu 14.04 virtual machines are named FEDACH and FOMFOR after the twin sons of Macha, daughter of Aodh Ruad. FEDACH has a DECnet address of 1.553 and FOMFOR has 1.554. They are now both connected to HECnet - the global hobbyist DECnet. They are configured to use DECnet on the eth1 network adapter (eth0 is dedicated to IP); the eth1 adapter has the correct MAC address corresponding to the DECnet address as required by DECnet:

1.553 => aa:00:04:00:29:06
1.554 => aa:00:04:00:2a:06

You can quickly look up the MAC address as well as the SCSSYSTEMID SYSGEN parameter for OpenVMS systems corresponding to a DECnet address using my free online DECnet - MAC address - SCSSYSTEMID Calculator.

Also, as DECnet uses all available NICs by default, I modified /etc/default/decnet to have DECnet on eth1 only, and increase verbosity of logging by the dnetd daemon. In addition, I modified the /etc/decnet.conf and /etc/decnet.proxy files as recommended by DECnet-linux documentation and man pages. Here is the output of "ip address show" for eth1 on the two nodes:

FEDACH

3: eth1: <BROADCAST,MULTICAST,UP,LOWER_UP> mtu 576 qdisc pfifo_fast state UP group default qlen 1000
    link/ether aa:00:04:00:29:06 brd ff:ff:ff:ff:ff:ff
    dnet 1.553 peer 1.553/16 scope global eth1

FOMFOR

3: eth1: <BROADCAST,MULTICAST,UP,LOWER_UP> mtu 576 qdisc pfifo_fast state UP group default qlen 1000
    link/ether aa:00:04:00:2a:06 brd ff:ff:ff:ff:ff:ff
    dnet 1.554 peer 1.554/16 scope global eth1


I created a "decnet" user account for FAL etc. to use by default as configured in /etc/decnet.proxy and the DECnet objects in /etc/dnetd.conf; interactive logins are disabled for this "decnet" account.

Lastly, I wanted the mail system to use the "decnet" account as well instead of the default (and non-existent) "vmsmail" account and created the file /etc/vmsmail.conf with a single line:

username=decnet

Usual DECnet network access commands all work from an external OpenVMS VAX 7.3 Node:

$ MC NCP TELL FEDACH SHOW EXECUTOR CHAR


Node Volatile Characteristics as of 25-SEP-2017 00:32:23

Executor node = 1.553 (FEDACH)

Circuit                  = eth1
State                    = on
Identification           = DECnet for Linux V3.13.0-129-generic on i686


$ DIR FEDACH::

Directory FEDACH::HOME:[DECNET]

DECNET-BUILD.TGZ;1  DECNET.TXT;1        INFO.TXT;1

Total of 3 files.
$ SET HOST FEDACH::
CTERM Version 1.0.6
DECnet for Linux

fedach login:


Mail also works from VMS to Linux over DECnet.

$ MAIL/SUBJECT="TEST MAIL FROM OPENVMS VAX TO UBUNTU DECNET-LINUX" X.COM FEDACH::ROOT

Produces these syslog entries on FEDACH showing mail delivery success:

Sep 29 10:20:46 fedach dnetd[1211]: Connection from: qcocal::sanyal
Sep 29 10:20:46 fedach dnetd[1211]: using user decnet from dnetd.conf
Sep 29 10:20:46 fedach dnetd[2108]: Starting daemon 'vmsmaild'
Sep 29 10:20:46 fedach vmsmaild[2108]: got local user: ROOT
Sep 29 10:20:46 fedach vmsmaild[2108]: Forwarding mail from qcocal::SANYAL       to root
Sep 29 10:20:46 fedach dnetd[1211]: Reaped child process 2108
Sep 29 10:20:46 fedach postfix/pickup[1351]: 8927E6CAB7: uid=1001 from=<decnet>
Sep 29 10:20:46 fedach postfix/cleanup[2112]: 8927E6CAB7: message-id=<20170929142046.8927E6CAB7@fedach.sanyalnet.lan>
Sep 29 10:20:46 fedach postfix/qmgr[1352]: 8927E6CAB7: from=<decnet@fedach.sanyalnet.lan>, size=1029, nrcpt=1 (queue active)
Sep 29 10:20:46 fedach postfix/local[2114]: 8927E6CAB7: to=<root@fedach.sanyalnet.lan>, orig_to=<root>, relay=local, delay=0.16, delays=0.06/0.1/0/0, dsn=2.0.0, status=sent (delivered to mailbox)
Sep 29 10:20:46 fedach postfix/qmgr[1352]: 8927E6CAB7: removed


DOWNLOADS

The DECnet-Linux configuration files for my two nodes along with the Ubuntu 14 CD ISO and dnprogs_2.62.tar.gz source files and binaries built on my nodes are available from my google drive here.


CONFIGURATION FILES

/etc/dnetd.conf (Identical for FEDACH and FOMFOR)


/etc/decnet.proxy (Identical for FEDACH and FOMFOR)


/etc/default/decnet (Identical for FEDACH and FOMFOR)


/etc/decnet.conf (FEDACH)


/etc/decnet.conf (FOMFOR)


-x-

Tuesday, September 12, 2017

DECnet Phase IV: copy node database from remote host and share it with other nodes over network with Digital DEC servers

Supratim Sanyal's Blog: DECnet-20 on TOPS-20 (TWENEX)
DECnet-20 on TOPS-20 (TWENEX) from "TOPS-20 DECnet-20 Programmer's Guide and Operations Manual" at Bitsavers


DECnet Phase IV on OpenVMS VAX 7.3

To copy the nodes database from a remote host and make it available to other nodes to copy from my node, I use the command file at the bottom. Here <REMOTE-NODE> is the DECnet node name / address of the host I copy my node database from.

After copying over the remote node database from another server (a PDP-11/24 running RSX-11M Plus that serves HECnet the world-wide hobbyist DECnet in this case), I basically copy SYS$SYSTEM:NETNODE_LOCAL.DAT and SYS$SYSTEM:NETNODE_REMOTE.DAT to SYS$COMMON:[SYSEXE] and grant them world-read permission.

Before doing this, other nodes that tried to copy the node database from my node (1.559) used to get this error, which does not happen any more:
$ MC NCP TELL 1.559 LIST KNOWN NODES
Known Node Permanent Summary as of 12-SEP-2017 18:29:00
%NCP-W-FILOPE, File open error , Permanent database
%NML-E-OPENIN, error opening SYS$COMMON:[SYSEXE]NETNODE_LOCAL.DAT; as input
-RMS-E-FNF, file not found

I also played around with enabling the NML proxy before running the commands in the DCL command file at bottom. I am not sure if I had enabled the NML proxy during installation of DECnet Phase IV and if these were required, but just doing these did not solve the problem. They may be required part of the solution, though.

$ MC NCP SET EXECUTOR INCOMING PROXY ENABLE
$ MC NCP DEFINE EXECUTOR INCOMING PROXY ENABLE
$ MC NCP SET OBJECT NML PROXY INCOMING
$ MC NCP DEFINE OBJECT NML PROXY INCOMING

Here is the DCL script:

$ SET PROC/PRIV=ALL
$ MC NCP copy known nodes from <REMOTE-NODE> using volatile to BOTH
$ MC NCP LIST KNOWN NODES
$ COPY/LOG/NOCONF SYS$SYSTEM:NETNODE_LOCAL.DAT SYS$COMMON:[SYSEXE]NETNODE_LOCAL.DAT
$ SET FILE/LOG/PROT=(W:R) SYS$COMMON:[SYSEXE]NETNODE_LOCAL.DAT
$ COPY/LOG/NOCONF SYS$SYSTEM:NETNODE_REMOTE.DAT SYS$COMMON:[SYSEXE]NETNODE_REMOTE.DAT
$ SET FILE/LOG/PROT=(W:R) SYS$COMMON:[SYSEXE]NETNODE_REMOTE.DAT


PDP-11/24 RSX-11M-PLUS 4.6


The HECnet node database is diligently maintained current at http://mim.update.uu.se/hecnod. It is a list of nodes, one per line, with a search box at the top. The line entries are in the form of white-space delimited information fields per node for HECnet nodes. The first two fields are the DECnet node address and the node name in round brackets. Here is an example line entry:

31.3 (PYRTR)    Reachable                   IP-0-9       31.3 (PYRTR)

The following simple Linux command-line fetches the HECnet node database over HTTP and produces a "nodename.cmd" command file that can be uploaded and executed on PDP-11/24 systems running RSX-11M-PLUS operating system (for example, my own node JUICHI). The command file will be a series of NCP command lines, one per node, setting the node addresses to node names.

curl -sNm 60 http://mim.update.uu.se/hecnod | dos2unix | egrep "^[0-9]" | cut -f 1-2 -d " " | sed -re 's/^/NCP SET NODE /' | sed -re 's/[(]/NAME /' | sed -re 's/[)]//' > nodename.cmd

But the resultant nodename.cmd misses the entry of 1.13 (MIM) because MIM is the executor and only mentions itself at the top of the list, not in the actual list of known nodes. So manually edit nodename.cmd and add a line for MIM:

NCP SET NODE 1.13 NAME MIM

To upload nodename.cmd to JUICHI, I FTP it to QCOCAL VAX and then use DECnet COPY to copy it over to JUICHI.

Alternatively, if we are already connected to HECnet, steps like the following get the node database straight from MIM using CFE. We can ignore the warnings for trying to redefine the executor's node name and address.


UNIBUS (UNA network device):

>NCP SET NODE MIM ADDRESS 1.13
NCP -- Set failed, invalid identification format, Node
>NFT FIX.CMD=MIM"GUEST GUEST"::HECNET:FIX.CMD
>RUN [5,54]CFERES
Enter filename: [5,54]CETAB
CFE>@fix.cmd
    DEF >>NOD 31.12 NAME JUICHI
CFE -- Parameter not applicable
CFE>^Z
>


QBUS (QNA network device):

>NCP SET NODE MIM ADDRESS 1.13
>NFT FIX.CMD=MIM"GUEST GUEST"::HECNET:FIX.CMD
>RUN [5,54]CFEFSL
Enter filename: [5,54]CETAB
CFE>@FIX.CMD
    DEF >>NOD 31.34 NAME NANAJU
CFE -- Parameter not applicable
CFE>^Z
>


PDP-10 KS10 TOPS-10 DECnet-10 (TWONKY)


To update the DECnet node database on my PDP-10 KS10 node "TWONKY" I run this command procedure from the [1,2] account:

;NODNAM.CMD
.r opr
*enter ncp
*set node 1.13 name mim
*return
*exit
.r nft
*copy fix.t20=mim::hecnet:FIX.T20/user:guest::guest
;exit
.r opr
*enter ncp
*take fix.t20
*exit
 

PDP-10 KL10 TOPS-20 DECnet-20 (TWENEX)

Current Approach

I have a command file "NODNAM.CMD" with the following contents which I then SUBMIT NODNAM.CMD as a batch job and watch the log using TYPE NODNAM.LOG.

;NODNAM.CMD
@ena
@r opr
*enter ncp
*set node 1.13 name mim
*return
*exit
@nft
*SET DEFAULTS MIM:: /USER:GUEST
*SET DEFAULTS MIM:: /PASSWORD:GUEST
*SET DEFAULTS MIM:: /ACCOUNT:GUEST
*copy mim::hecnet:fix.t20 fix.t20
;Access information for node mim::
;User: guest
;Account: guest
;Password:guest
;mim::DU1:[DECNET]FIX.T20;123 => TOPS20:<OPERATOR>FIX.T20.2 [OK]
*exit
@r opr
*enter ncp
*take fix.t20
*exit
@info batch
@echo game over

Once the bacth job completes, the latest HECnet node names are defined on TWENEX, and I can, for example, successfully do this:

$OPR
OPR>NCP TELL NJEVX2 SHOW EXEC CHAR
OPR>
04:31:53        NCP
                Request # 288 Accepted
OPR>
04:31:53        NCP

Request # 288; Show Executor Node Characteristics Completed

Executor Node = 31.36 (NJEVX2)

  Identification = DECnet for OpenVMS VAX V7.3
  Management Version = 4.0.0
  Incoming Timer = 45
  Outgoing Timer = 60
  Parameter #522 = 0
  Parameter #523 = 0
  NSP Version = 4.1.0
  Maximum Links = 32
  Delay Factor = 80
  Delay Weight = 5
  Inactivity Timer = 60
  Retransmit Factor = 10
  Routing Version = 2.0.0
  Type = Nonrouting IV
  Routing Timer = 600
  Broadcast Routing Timer = 180
  Maximum Address = 1023
  Maximum Circuits = 16
  Maximum Cost = 1022
  Maximum Hops = 30
  Maximum Visits = 63
  Maximum Area = 63
  Maximum Broadcast Nonrouters = 64
  Maximum Broadcast Routers = 32
  Parameter #933 = 1
  Area Maximum Cost = 1022
  Area Maximum Hops = 30
  Maximum Buffers = 100
  Buffer Size = 576
  Non-privileged User ID = DECNET
  Default access = Incoming and outgoing
  Pipeline quota = 4032
  Parameter #2743 = 32
  Parameter #2780 = 0
  Parameter #2785 = 31
OPR>EXIT
$LOGOUT
[Jobs 0(DET), 1, 2(DET), 3, 4, 5, 6, 7, 8 also logged in under OPERATOR]
Killed Job 9, User OPERATOR, TTY5, at 10-Feb-2020 04:38:35

 Used 0:00:00 in 0:04:44

Prior (Obsolete) Approach

To update the DECnet node database on my PDP-10 TWENEX node I first run the following Linux command line to produce a nodnm20.cmd command file. The generated command file is basically a series of lines of the form "SET NODE <xx.yyy> NAME <name>" based on the nodename database retrieved over the web from MIM.


curl -sNm 60 http://mim.update.uu.se/hecnod | dos2unix | egrep "^[0-9]" | cut -f 1-2 -d " " | sed -re 's/^/SET NODE /' | sed -re 's/[(]/NAME /' | sed -re 's/[)]//' > nodnm20.cmd


I then manually edit nodnm20.cmd to add a line for MIM itself:

SET NODE 1.13 NAME MIM

and then upload nodnm20.cmd using OPERATOR account to TWENEX. For uploading, I FTP it to a VAX (e.g. QCOCAL) and the use DECnet COPY from the VAX to TWENEX, like this:

$ COPY/LOG nodnm20.cmd TWENEX"OPERATOR <PASSWORD>"::

Then, my subsequent steps to update the TOPS-20 MONITOR are:

^C
@LOGIN OPERATOR
Password: 
 End of <SYSTEM>LOGIN.CMD.2
 End of LOGIN.CMD.1
@ENA
$COPY NODNM20.CMD  SYS:
 NODNM20.CMD.1 => <SUBSYS>NODNM20.CMD.3 [OK]
$PURGE SYS:
$DIR SYS:NOD*.CMD

   TOPS20:<SUBSYS>
 NODNM20.CMD.3


 Total of 8 pages in 1 file
$RUN SYS:SETNOD
SETNOD>TAKE NODNM20.CMD
SETNOD>SAVE SYSTEM:DECNET-NODES.DAT

SETNOD>INSERT
SETNOD>EXIT


PDP-11/73 RSTS/E 10.1 DECnet/E V4.1


Updating the DECnet node database on my PDP-11/73 running RTST/E 10.1 with DECnet/E 4.1 is similar, but not identical, to TWENEX and RSX-11M-PLUS. The following Linux bash shell script produces a RSTS/E command file defnod.cmd. It includes DEFINE NODE commands and then SET NODE commands to update the permanent as well as volatile node databases.

#!/bin/bash
OUTFILE="defnod.cmd"
echo "SET VER" > ${OUTFILE}
echo "SET NOON" >> ${OUTFILE}
curl -sNm 60 http://mim.update.uu.se/hecnod | dos2unix | egrep "^[0-9]" | cut -f 1-2 -d " " | sed -re 's/^/NCP DEFINE NODE /' | sed -re 's/[(]/NAME /' | sed -re 's/[)]//' >> ${OUTFILE}
sleep 5
curl -sNm 60 http://mim.update.uu.se/hecnod | dos2unix | egrep "^[0-9]" | cut -f 1-2 -d " " | sed -re 's/^/NCP SET NODE /' | sed -re 's/[(]/NAME /' | sed -re 's/[)]//' >> ${OUTFILE}
ls -l ${OUTFILE}


I then manually edit defnod.cmd and add a line for MIM itself:

NCP SET NODE 1.13 NAME MIM

and FTP the final defnod.cmd to a VAX/VMS box and then copy it over DECnet to the [1,2] account on RSTS/E. The /OVERWRITE switch is necessary here since DECnet/E for RSTS/E refuses to overwrite the file if it already exists.

$ copy *nod.cmd RST101"1,2 <password>":: /log /over
%COPY-I-OVERLAY, RST101"1,2 password"::SY:[1,2]DEFNOD.CMD being overwritten
%COPY-S-COPIED, DUA1:[SANYAL]DEFNOD.CMD;2 copied to RST101"1,2 password"::SY:[1,2]DEFNOD.CMD (95 blocks)

Then I log into RSTS/E as 1,2 and execute the command file.

$ @defnod.cmd

A simple test to check if it works:

$ NCP TELl NJEVX2 SHOW EXEC CHAR
Node Volatile Characteristics as of 11-FEB-20 23:23:52

Executor Node = 31.36 (NJEVX2)

Identification             = DECnet for OpenVMS VAX V7.3
Management Version         = 4.0.0
Incoming Timer             = 45
Outgoing Timer             = 60
Parameter #522             = %H'00' 
Parameter #523             = %H'00' 
ECL Version                = 4.1.0
Maximum Links              = 32
Delay Factor               = 80
Delay Weight               = 5
Inactivity Timer           = 60
Retransmit Factor          = 10
Routing Version            = 2.0.0
Type                       = Non-Routing IV
Routing Timer              = 600
Broadcast Routing Timer    = 180
Maximum Address            = 1023
Maximum Circuits           = 16
Maximum Cost               = 1022
Maximum Hops               = 30
Maximum Visits             = 63
Maximum Area               = 63
Max Broadcast Nonrouters   = 64
Max Broadcast Routers      = 32
Parameter #933             = %D'1' 
Area Maximum Cost          = 1022
Area Maximum Hops          = 30
Maximum Buffers            = 100
Buffer Size                = 576
Parameter #2712            = %A'DECNET' 
Parameter #2731            = %H'03' 
Parameter #2740            = %D'4032' 
Parameter #2743            = %D'32' 
Parameter #2780            = %H'00' 
Parameter #2785            = %D'31' 
$ 


Apple Macintosh Classic MacOS 7 & MacOS 9 - Thursby TSSNet / DEC Digital Pathworks for Macintosh

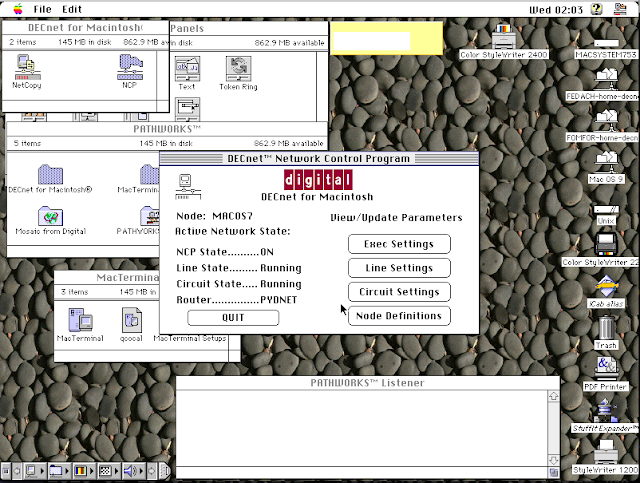
From the TSSNet or DECnet for Macintosh folder, launch the NCP application. This will open up the "DECnet Network Control Program" (NCP) window.

Click on the "Node Definitions" long button on the "DECnet Network Control Program" window.


DECnet for Macintosh: Thursby Software TSSNET for Macintosh: Copy node database - Screen 1


The "DECnet Node Name Management" window will be displayed. Fill in the Area Number and Node Number of the remote DECnet node which you want to copy the node database from. Then click on the "Ask" button.


DECnet for Macintosh: Thursby TSSnet for Macintosh: Copy node database - Screen 2


You will be presented with a windows asking for the Username and Password. Usually there is not Username and Password configured for DECnet Node Database access; leave them empty and click on OK.


DECnet for Macintosh: Thursby Software TSSnet for Macintosh: Copy node database - Screen 3


The next question will be about the name of the node or area number that you are inquiring about. Since we want to copy over the entire node database including all areas and all nodes, enter an asterisk (*) and click on INQUIRE.

DECnet for Macintosh: Thursby TSSNET for Macintosh: Copy node database - Screen 4


A pop-up will now say "Loading Node : " followed by rapidly changing node names as their definitions are copied over from the remote node.


DECnet for Macintosh: Thursby Software TSSNET for Macintosh: Copy node database - Screen 5


Windows NT 4.0 - DEC Pathworks 32 7.4


Supratim Sanyal's Blog: Copy DECnet Phase IV Node Databse from OpenVMS VAX server to Windows NT 4.0 running DEC Pathworks 32 7.4 over DECnet using NCP copy command


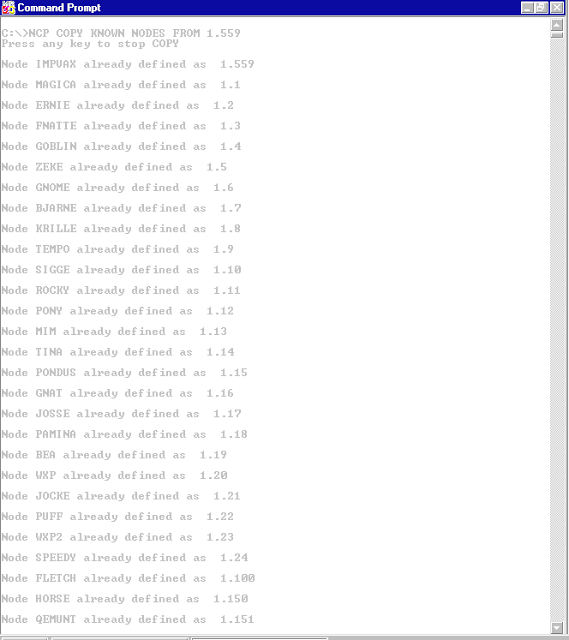
After configuring DEC Pathworks 32 on Windows NT 4.0 and establishing DECnet Phase IV communication with my DECnet nodes, I copied over the DECnet node database from IMPVAX OpenVMS VAX 7.3 (1.559) to Windows NT 4.0 Pathworks-32 using the simple NCP command:

NCP COPY KNOWN NODES FROM 1.559

A subsequent NCP LIST KNOWN NODES command produced a full list of DECnet nodes copied over from IMPVAX.


DECnet/Python


Paul Koning's DECnet/Python expects a list of DECnet nodes and addresses, one on each line, in the format:

node address name

This bash shell script generates a suitable nodenames.conf database for HECnet:

CISCO Switches (DECnet over GRE tunnel on CISCO 7204VXR)


Saturday, September 9, 2017

From Supernova to Intel Xeon L2 CPU Cache: My Own Machine Check Event (MCE) Glitch!

Supratim Sanyal's Blog: A Supernova Causes a MCE Machine Check Event on Intel Processor
Less than thirteen and a three-quarters of a billion years ago, a star the size of about fifteen times our own sun ran out of hydrogen fuel in its core to burn into helium.

Undeterred and left with prodigious amounts of helium, it non-nonchalantly started on the helium to burn to carbon for a few billion years. Then it lit up the carbon, and spent billions of years to continue up the periodic table - aluminum, silicon, nickel, copper, lead ... all the while pushing the lighter stuff outwards in layers and getting heavier in the middle where gravity kept getting happier. In another few billion years, gravity betrayed a little smile when the star crossed over the Chandrasekhar Limit. For gravity had won again, as it always does; all the energy of the burning core could no longer hold the star up. The collapse started.

The unrelenting crush of gravity then continued to make that star's core so dense and so hot that, more importantly than human equations trying to compute it starting to fail, something had to give.

After billions of years of cooking the elements, it took barely one and a half minutes for the core to explode, lighting up the universe with such brightness that it would be clearly visible to naked human eyes in daytime when that light would reach planet Earth.

The supernova explosion scattered the periodic table into space. Some of that ejected matter coagulated into a scary collection of mostly hydrogen and carbon-based molecules which would be labeled together as "Supratim Sanyal". 

The explosion also fired off, at light speed in all directions, billions of little monsters - atomic nuclei with no electrons, alpha particles, electrons and friends. One of these - a hydrogen nucleus, which is just a proton, traveled unchallenged a few billion light years only to finally get arrested by the L2 cache of the 8th Xeon CPU in my Dell PowerEdge 2950 in the basement.

Supratim Sanyal's Blog: Machine Check Event (MCE) Error - Intel Xeon L2 Cache Error
Machine Check Event (MCE)
I have never faced a Machine Check Event before.

I logged into my old faithful and rock-solid Dell PowerEdge 2950 blade server just now, and was informed:

ABRT has detected 1 problem(s). For more info run: abrt-cli list --since 1504666020

Okay, so I ran the recommended command, and got:

# abrt-cli list --since 1504666020
id ea6720f12a431197ca717b7bcd90f43f7a92d366
reason:         mce: [Hardware Error]: Machine check events logged
time:           Thu 07 Sep 2017 07:28:16 PM UTC
cmdline:        BOOT_IMAGE=/vmlinuz-3.10.0-514.26.2.el7.x86_64 root=/dev/mapper/centos_dellpoweredge2950-root ro rd.lvm.lv=centos_dellpoweredge2950/root rd.lvm.lv=centos_dellpoweredge2950/swap rhgb quiet LANG=en_US.UTF-8
package:        kernel
uid:            0 (root)
count:          1
Directory:      /var/spool/abrt/oops-2017-09-07-19:28:16-12996-0
Reported:       cannot be reported


The Autoreporting feature is disabled. Please consider enabling it by issuing
'abrt-auto-reporting enabled' as a user with root privileges

At this point, I googled "Machine Check Event" and learned that one of the reasons a MCE could happen is cosmic rays! Unless, of course, the processor or hardware or bus or some such thing is really going bad; the PowerEdge 2950 is a decade old anyway.

The forums also recommended running "mcelog", which I did not have, but was readily available in the repos.

# yum install mcelog

Now I could run mcelog.

# mcelog
Hardware event. This is not a software error.
MCE 0
CPU 7 BANK 3
ADDR 43f883580
TIME 1504812495 Thu Sep  7 19:28:15 2017
MCG status:
MCi status:
Corrected error
Error enabled
MCi_ADDR register valid
Threshold based error status: green
MCA: Generic CACHE Level-2 Generic Error
STATUS 942000570001010a MCGSTATUS 0
MCGCAP 806 APICID 7 SOCKETID 1
CPUID Vendor Intel Family 6 Model 23

OK, so it clearly says this MCE is not software-related, and whatever it was, it was corrected. It is also probably trying to say the L2 cache on the 8th CPU misfired that time.

A few quick checks with htop, top, iotop, etc. do not indicate any issues. Therefore, I will blame it on cosmic rays this time and let it go. If hardware is indeed failing, I will know soon enough.

It may be worth keeping an eye on eBay for a replacement blade server.

Thursday, September 7, 2017

OpenVMS-Linux-Windows File-Sharing over DECnet using FAL on DEC Pathworks for Windows NT 4.0

Supratim Sanyal's Blog: DEC Pathworks DECnet on Windows NT 4.0 Hobbyist System at SANYALnet Labs
DEC Pathworks: Windows NT as a DECnet node


Thanks to DECnet-Linux on my Ubuntu 14 boxes, DECnet on OpenVMS on a couple of SIMH VAX servers and DECnet on RSX-11M PLUS on a SIMH PDP-11/24 server, it is eminently possible to kick the Internet Protocol (IP) completely off a local LAN and use DECnet for logging in and sharing files across these machines. Windows was the missing piece, and I decided to throw an Windows NT 4.0 server into the mix. I could have chosen Windows 2000, XP, or later - but there is a certain charm in NT4 service-pack 6a + post 6a security rollup - a charm only felt by folks dated to the 8-bit era like me.

The saga of sharing files over DECnet from Windows NT 4.0 starts after I had DEC Pathworks 32 v7.4 up and running on my NT 4.0 workstation. At this point, ENTEE4 (DECnet address 1.557) is happily talking DECnet with two other nodes around my lab, as validated using tshark sniffing on the DECnet-dedicated network from Ubuntu 14 boxes equipped with DECnet-Linux (DECnet addresses 1.553 and 1.554). Everybody is saying hello to everyone else and it is a happy little island world.

$ tshark -i eth1
Capturing on 'eth1'
1930  39.386556        1.554 -> 1.553        DEC DNA 59 msg nr. 2 single segment, bytes this segment: 10, total so far:10
1931  39.386874        1.553 -> 1.554        DEC DNA 60 NSP data ACK message(2)
1932  39.386937        1.554 -> 1.553        DEC DNA 62 msg nr. 3 single segment, bytes this segment: 13, total so far:13
1934  39.388100        1.554 -> 1.553        DEC DNA 160 msg nr. 4 single segment, bytes this segment: 111, total so far:111
1937  39.388667        1.554 -> 1.553        DEC DNA 45 NSP disconnect initiate/confirm message
1939  39.403927        1.553 -> 1.557        DEC DNA 85 NSP connect confirm/initiate message
1946  39.461562        1.553 -> 1.557        DEC DNA 66 msg nr. 1 single segment, bytes this segment: 17, total so far:17
1948  39.462705        1.557 -> 1.553        DEC DNA 64 msg nr. 1 single segment, bytes this segment: 20, total so far:20
1952  39.492906        1.557 -> 1.553        DEC DNA 1494 msg nr. 2: start of segment, bytes this segment: 1450, total so far:1450
1953  39.492919        1.557 -> 1.553        DEC DNA 1494 msg nr. 3: continuation segment , bytes this segment: 1450, total so far:2900
1954  39.492922        1.557 -> 1.553        DEC DNA 1494 msg nr. 4: continuation segment , bytes this segment: 1450, total so far:4350
1960  39.493251        1.557 -> 1.553        DEC DNA 933 msg nr. 7: end of segment, bytes this segment: 889, total so far:8139
1966  39.999976        1.554 -> DECNET-Phase-IV-end-node-Hello-packets DEC DNA 50 Routing control, Endnode Hello message
...

Before starting FAL configuration, the two sources of information that I found extremely useful, and where all the information in this post is gleaned from, are

  • Pathworks Installation Guide (still available from Compaq here)
  • Pathworks Information Shelf installed along with Pathworks application files

Now, to get Pathworks FAL operational. First, using the Windows NT User Rights Policy manager, I added the "Log on as a batch job" right to the "Users" group. This is fairly well documented in the Pathworks installation guide. The steps are:

Supratim Sanyal's Blog: DEC Pathworks DECnet FAL configuration - Add "Log on as a batch job" right to "Users" group on Microsoft Windows NT 4.0
Add "Log on as a batch job" right to "Users" group on Microsoft Windows NT 4.0

  • Start -> Programs -> Administrative Tools -> User Manager
  • From the menu bar at top of User Manager, choose Policies -> User Rights. This will pop up a "User Rights Policy" window.
  • Click on the little checkbox at the bottom saying "Show Advanced User Rights"
  • From the "Right" drop-down list in the upper area, choose "Log on as a batch job"
  • Click "Add..." in the bottom right area. This will pop up another window titled "Add users and groups".
  • Choose "Users" in the "Names" area at the top (scroll down to see "Users").
  • Click on "Add" button in the middle. This will add "<computer-name>\Users" in the white text area in the bottom half.
  • Click "OK" at the bottom.
  • You will back at the "User rights policy" window. Click OK.
  • You will be back at the "User Manager" window. From the top menu, click User -> Exit to exit out.


Second step - I created a user called DECNET with home directory C:\DECNET and added this user to the "Users" group that we manipulated previously. The DECNET user thus has the all-important "Log on as a batch job" right.

Supratim Sanyal's Blog: DECnet Windows NT 4.0 Pathworks Setup - Add a DECNET user for Windows NT 4.0 for testing with DEC Pathworks DECnet services
Add a DECNET user for Windows NT 4.0 for testing with DEC Pathworks DECnet services

  • Start -> Programs -> Administrative Tools -> User Manager
  • From the menu bar at top of User Manager, choose "New User...". This will pop up a "New User" window. Fill in the username (DECNET), provide a password that you can remember, and clear all four check-boxes.
  • Click on "Groups" at the bottom. In the "Group Memberships" window that pops up, the user should already be a member of the "Users" group; therefore no more action here. Click on OK to return to the "New User" window.
  • Click on "Profile" at the bottom to open up the "User Environment Profile" pop-up. In the "Home Directory" section in the lower panel, change "Local Path" to "C:\DECNET". Click on OK to return to the "New User" window, and OK again.
  • You will be back at the "User Manager" window. From the top menu, click User -> Exit to exit out.
Third step - grant Administrator access to the user directory. In the prior step, the User Manager created the home directory with access permissions only for the specific user. However, for the FAL object to access the contents of the directory, we need the directory permissions set to allow full Administrator access. This is performed from an Administrator account as follows:

Supratim Sanyal's Blog: DEC Pathworks Windows NT 4.0 FAL server configuration - Give Administrators Full Control on the new home directory for the DECNET user account
Give Administrators Full Control on the new home directory for the DECNET user account


  • From Start -> Windows NT Explorer, Right-Click on the DECNET folder under C: drive.
  • Choose Properties
  • Click on the Security tab
  • Click on Permissions
  • Click on "Add" at the bottom
  • In the "Add Users and Groups" window,  choose "Administrators" in the "Names" area at the top half, and click "Add" in the middle. This will add "<computer name>\Administrators" to the "Add Names" area in the bottom half.
  • In the "Type of Access" drop-down list at the bottom, choose "Full Control"
  • Click on OK, OK and OK to exit out of the three open screens.
  • That's it; now the C:\DECNET folder has full access permissions for both the owner DECNET as well as Administrator group accounts.

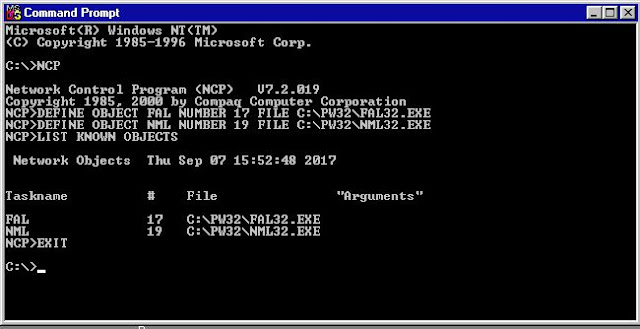
Fourth step - configure FAL and NML services on Windows NT 4.0 Pathworks using Network Control Program (NCP). To do this, open a MS-DOS command prompt and issue the command "NCP" to enter the NCP prompt. Then issue NCP commands to define the File Access Listener (FAL) and the Network Management Listener (NML) objects. Keep in mind the object numbers 17 and 19 cannot be changed; they are specifically allocated to FAL and NML objects.

Supratim Sanyal's Blog: DEC Pathworks Windows NT - Configure FAL and NML server objects from NCP - DECnet
DEC Pathworks Windows NT - Configure FAL and NML server objects from NCP


C:\>NCP

Network Control Program (NCP)   V7.2.019
Copyright 1985, 2000 by Compaq Computer Corporation
NCP>DEFINE OBJECT FAL NUMBER 17 FILE C:\PW32\FAL32.EXE
NCP>DEFINE OBJECT NML NUMBER 19 FILE C:\PW32\NML32.EXE
NCP>LIST KNOWN OBJECTS

 Network Objects  Thu Sep 07 15:52:48 2017


Taskname          #    File               "Arguments"

FAL               17   C:\PW32\FAL32.EXE
NML               19   C:\PW32\NML32.EXE
NCP>EXIT


Log out of the Windows Administrator account, and log in as DECNET. Create a file called INFO.TXT in C:\DECNET to play (i.e. test) with.

All done, now we can talk to Windows NT 4.0 running Pathworks from other DECnet hosts. It all works from DECnet on OpenVMS and PDP-11/24 hosts in my hobbyist lab, and also playing around with my Ubuntu boxes running DECnet-Linux, I can use DECnet-Linux commands to access Windows NT files:

$ dndir 'entee4"DECNET password"::'

Directory of C:[DECNET]

INFO.txt

$ dntype -mblock 'entee4"decnet password"::info.txt'
 _______   ________   _________  _______   _______   ___   ___
|\  ___ \ |\   ___  \|\___   ___\\  ___ \ |\  ___ \ |\  \ |\  \
\ \   __/|\ \  \\ \  \|___ \  \_\ \   __/|\ \   __/|\ \  \\_\  \
 \ \  \_|/_\ \  \\ \  \   \ \  \ \ \  \_|/_\ \  \_|/_\ \______  \
  \ \  \_|\ \ \  \\ \  \   \ \  \ \ \  \_|\ \ \  \_|\ \|_____|\  \
   \ \_______\ \__\\ \__\   \ \__\ \ \_______\ \_______\     \ \__\
    \|_______|\|__| \|__|    \|__|  \|_______|\|_______|      \|__|

                   A SANYALnet LABS HOBBYIST SERVER

+++
| Welcome to entee4.sanyalnet.lan.
|
| This is a Microsoft Windows NT 4.0 Workstation with
| Digital DEC (Compaq) Pathworks. It speaks IP and DECnet.
+++


That concludes my experiment with a DECNET account shared using FAL server object over DECnet on a Windows NT 4.0 server running DEC Pathworks 32. Please share your experiments and results in the comments below!


Recommended Products from Amazon