Search

Sunday, December 16, 2018

Deploying a Dual-NIC DEC VAX running NetBSD 8 on a Raspberry Pi

Supratim Sanyal's Blog: Digital DEC VAX running NetBSD Operating System on Raspberry Pi SOC using SIMH emulator for ARM Processor


I got a SIMH MicroVAX 3900 instance loaded with the latest 2018 NetBSD/vax 8.0 on a Raspberry Pi 3B+ running Raspbian Stretch Lite 4.14.79-v7+ armv7l GNU/Linux.

The VAX has two Digital RA92 disk drives and two Digital DELQA Q-Bus Ethernet Controller network adapters. My usual practice is to keep DECnet and IP networks separate; the first DELQA talks IP and the 2nd DELQA will perhaps talk DECnet, or at the least LAT, if this NetBSD port of the latd daemon from DECnet-Linux works (I will write about it in a future blog post if it does).

The virtual SIMH network adapters are connected to the Raspberry Pi host using VDE (virtual distributed Ethernet) which is natively supported by SIMH (see SIMH ini file later down).

The following packages were installed in preparation:

# apt-get install libpcap-dev bridge-utils p7zip net-tools screen openvpn wireshark tshark tcpdump iptraf libsdl2-dev wget binutils-doc make autoconf automake1.9 libtool flex bison gdb vde2 libvdeplug2 vde2-cryptcab libvde-dev libvdeplug-dev ipcalc htop iotop stunnel4

SIMH stable 3.9 source code was downloaded and compiled using the following command line which I have described previously in "How to Build Your Own Digital DEC MicroVAX 3900 Running OpenVMS VAX VMS Operating System: SIMH on CentOS 7 Running OpenVMS/VAX 7.3".

# make USE_READER_THREAD=1 USE_TAP_NETWORK=1 USE_INT64=1 vax vax780 pdp11

The Raspbian DHCP service "dhcpcd" was disabled, and a static IP configuration was set in the file /etc/network/interfaces.d/eth0:

root@pi01:~# cat /etc/network/interfaces.d/eth0
auto eth0
iface eth0 inet static

        address         192.168.1.10
        netmask         255.255.255.0
        network         192.168.1.0
        broadcast       192.168.1.255
        gateway         192.168.1.1

        dns-nameservers 208.67.222.222 208.67.220.220
        post-up /root/netsetup/bridge-tap-vde-setup.sh > /tmp/bridge-tap-vde-setup.sh.log 2>&1


The "/root/netsetup/bridge-tap-vde-setup.sh" script referenced above is used to set up a VDE switch and plugs for SIMH (as well as an additional tun/tap for future use):

#!/bin/bash
#
# ---
# bridge-tap-vde-setup.sh
# ---
# Bridge, VDE and Tun/Tap Network Device Setup Script to run emulators.
# Tested on Raspberry Pi Raspbian GNU/Linux 9 armv7l / 4.14.79-v7+
#
# Basically does this:
#
#   -------
#  |Network|
#  |Adapter|
#  |eth0   |
#   -------
#      |           ------
#       ----------|bridge|
#                 |br-ip |
#                  ------
#                    |         --------
#                    |--------|inettap0| <--> For use by TBD emulator
#                    |         --------
#                    |
#                    |         ----------
#                     --------|VDE Switch| (Virtual Distributed Ethernet switch)
#                              ----------
#                              |
#                              |  -----------
#                              |-|vde-ip-tap0| <--> Available to more TBD emulators
#                              |  -----------
#                              |
#                              |  -----------
#                              |-|vde-ip-tap1| <--> Available to more TBD emulators
#                              |  -----------
#
# More details:
# http://supratim-sanyal.blogspot.com/2018/10/bionic-beaver-on-zarchitecture-my.html
#
# Licensed under "THE BEER-WARE LICENSE" (Revision 42):
# Supratim Sanyal <https://goo.gl/FqzyBW> wrote this file. As long as
# you retain this notice you can do whatever you want with this stuff.
# If we meet some day, and you think this stuff is worth it, you can buy
# me a beer in return.
# ---

# ---
# Raspbian specific; dhcpcd is disabled as it was getting IP addresses for all taps and vdeplugs
# ---

# ----
# The physical interface that has the IP address which will be moved to a bridge and
# TAP and VDE plug interfaces made available from the bridge
# ----
DEVICE="eth0"

# ----
# No more changes should be required from here
# ----

HOSTIPANDMASK=`ip addr show dev $DEVICE | grep inet | head -1 | cut -f 6 -d " "`
HOSTIP=`echo $HOSTIPANDMASK|cut -f 1 -d "/"`
HOSTNETMASK=`echo $HOSTIPANDMASK|cut -f 2 -d "/"`
HOSTBCASTADDR=`ip addr show dev $DEVICE | grep inet | head -1 | cut -f 8 -d " "`
HOSTDEFAULTGATEWAY=`route -n | grep ^0.0.0.0 | gawk -- '{ print $2 }'`
NETWORK=`ipcalc $HOSTIP/$HOSTNETMASK | grep Network | cut -f 2 -d ":" | cut -f 1 -d "/" | tr -d '[:space:]'`

echo `date` ---- GATHERED INFORMATION -----
echo `date` HOSTIP=$HOSTIP HOSTNETMASK=$HOSTNETMASK NETWORK=$NETWORK HOSTBCASTADDR=$HOSTBCASTADDR HOSTDEFAULTGATEWAY=$HOSTDEFAULTGATEWAY
echo `date` -------------------------------

# ---
# Create a TAP network interface for emulators
# ---
ip tuntap add inettap0 mode tap user johnsmith

# ---
# Also create a VDE switch with TAP plugs for use by simuators
# ---

#
vde_switch -t vde-ip-tap0 -s /tmp/vde-ip.ctl -m 666 --mgmt /tmp/vde-ip.mgmt --mgmtmode 666 --daemon # spare plug
vde_plug2tap -s /tmp/vde-ip.ctl -m 666 -d vde-ip-tap1  # spare plug
#vde_plug2tap -s /tmp/vde-ip.ctl -m 666 -d vde-ip-tap2  # spare plug
#vde_plug2tap -s /tmp/vde-ip.ctl -m 666 -d vde-ip-tap3  # spare plug

# Create a Bridge
ip link add name br-ip type bridge
brctl stp br-ip on

# Bridge the NIC $DEVICE, the TAP device and VDE Switch TAP0 plug
ip link set $DEVICE master br-ip
ip link set inettap0 master br-ip
ip link set vde-ip-tap0 master br-ip

# Remove default route and move the IP address from $DEVICE to the bridge
ip route delete default via $HOSTDEFAULTGATEWAY dev $DEVICE
ip addr flush dev $DEVICE
ip addr add $HOSTIPANDMASK broadcast $HOSTBCASTADDR dev br-ip

# Bring everything back up
ip link set dev br-ip up
ip link set dev inettap0 up
ip link set vde-ip-tap0 up
ip link set vde-ip-tap1 up
#ip link set vde-ip-tap2 up
#ip link set vde-ip-tap3 up

# Reset the default route via the bridge interface which now has the IP
ip route add default via $HOSTDEFAULTGATEWAY dev br-ip

#echo `date` ---- NETWORK RECONFIGURED, WAITING TO SETTLE DOWN ----
#sleep 30

echo `date` ---- RELOADING UFW ----
ufw reload
sync

echo `date` ---- AFTER BRIDGE AND TAP ----
ip addr
echo `date` --- ROUTE ---
#ip route show
route -n
echo `date` --- BRIDGE ---
brctl show
#echo `date` --- IPTABLES ---
#iptables -L
echo `date` --- UFW ---
ufw status verbose
#echo `date` --- PING TEST ---
#ping -c 5 google.com
echo `date` -------------------------------

# --
# We can now attach simulators
# --


The above network setup script produces a network like so:

$ ip addr
1: lo: <LOOPBACK,PROMISC,UP,LOWER_UP> mtu 65536 qdisc noqueue state UNKNOWN group default qlen 1000
    link/loopback 00:00:00:00:00:00 brd 00:00:00:00:00:00
    inet 127.0.0.1/8 scope host lo
       valid_lft forever preferred_lft forever
2: eth0: <BROADCAST,MULTICAST,PROMISC,UP,LOWER_UP> mtu 1500 qdisc pfifo_fast master br-ip state UP group default qlen 1000
    link/ether b8:27:eb:48:39:a9 brd ff:ff:ff:ff:ff:ff
3: wlan0: <BROADCAST,MULTICAST,PROMISC> mtu 1500 qdisc noop state DOWN group default qlen 1000
    link/ether b8:27:eb:1d:6c:fc brd ff:ff:ff:ff:ff:ff
4: inettap0: <NO-CARRIER,BROADCAST,MULTICAST,PROMISC,UP> mtu 1500 qdisc pfifo_fast master br-ip state DOWN group default qlen 1000
    link/ether b2:e3:6b:52:47:c4 brd ff:ff:ff:ff:ff:ff
5: vde-ip-tap0: <BROADCAST,MULTICAST,PROMISC,UP,LOWER_UP> mtu 1500 qdisc pfifo_fast master br-ip state UNKNOWN group default qlen 1000
    link/ether be:cd:00:ed:5c:5a brd ff:ff:ff:ff:ff:ff
6: vde-ip-tap1: <BROADCAST,MULTICAST,PROMISC,UP,LOWER_UP> mtu 1500 qdisc pfifo_fast state UNKNOWN group default qlen 1000
    link/ether c6:94:81:f1:ec:5a brd ff:ff:ff:ff:ff:ff
7: br-ip: <BROADCAST,MULTICAST,PROMISC,UP,LOWER_UP> mtu 1500 qdisc noqueue state UP group default qlen 1000
    link/ether b2:e3:6b:52:47:c4 brd ff:ff:ff:ff:ff:ff
    inet 192.168.1.10/24 brd 192.168.1.255 scope global br-ip
       valid_lft forever preferred_lft forever


A SIMH ini file was created for the MicroVAX 3900 to install and run NetBSD:

; -------------------------------------------------
; SIMH MicroVAX 3900 "NETBSD" (x.xxx) Configuration
; SANYALnet Labs
; supratim@riseup.net
; http://supratim-sanyal.blogspot.com/
; -------------------------------------------------
; Load CPU microcode
load -r ../data/ka655x.bin
;
; Attach non-volatile RAM to a file
attach nvr ../data/nvram.bin
;
; The original MicroVAX 3900 had a max of 64MB memory
set cpu 64m
set cpu idle=netbsd
;
; Define disk drive types. RA92 is largest-supported VAX drive.
set rq0 ra92
set rq1 ra92
;
; Attach defined drives to local files
attach rq0 ../data/netbsd-vax-d0.dsk
attach rq1 ../data/netbsd-vax-d1.dsk
;
; Attach the CD-ROM to its file (read-only)
set rq2 cdrom
attach -r rq2 ../data/NetBSD-8.0-vax.iso
;
; Disable unused devices. It's also possible to disable individual devices,
; using a construction like "set rq2 disable" if desired.
;
set rq3 disable
set rl disable
set ts disable
;
; Attach network adapters
set xq enabled
set xq type=DELQA
set xq mac=aa-00-00-ed-5c-a5
attach xq vde:/tmp/vde-ip.ctl

set xqb enabled
set xqb type=DELQA
set xqb mac=AA-00-04-00-8E-07
attach xqb vde:/tmp/vde-ip.ctl

;
; ********************************************
; ********************************************
; Uncomment the line below to enable auto-boot
; ********************************************
; ********************************************
;---dep bdr 0
;
; Choose one of the following lines. SET CPU CONHALT returns control to the
; VAX console monitor on a halt event (where behavior will be further
; determined by whether auto-boot is set (see "dep bdr" above).
; SET CPU SIMHALT will cause the simulator to get control instead.
;set cpu conhalt
set cpu simhalt
;
echo
echo
echo ___________________________________
;
; Now start the emulator
boot cpu
;
; Exit the simulator
exit

Finally, the MicroVAX 3900 was booted up from CD-ROM ("boot dua2" in SIMH) and NetBSD/VAX installation started.

Supratim Sanyal's Blog: Raspberry Pi SIMH emulator - Installing NetBSD for VAX on MicroVAX 3900


The actual NetBSD/vax 8.0 installation process on the DEC MicroVAX 3900 was well designed, user-friendly sensible with no surprises, though it takes a bit of time for the full installation (hours!). The installation screens are documented extensively at NetBSD Example Installation.

It was fun to finally boot into a classic Microvax 3900 running a modern and current NetBSD for VAX operating system. Here is a little video of the experience.




Tuesday, November 13, 2018

Fun with OpenBSD for SPARC64 | High-Security O/S on 64-bit Sun UltraSPARC using QEMU Sun4U and User-mode Networking Back-End

Supratim Sanyal's Blog: Sun UltraSPARC 1
Sun Microsystems UltraSPARC 1
Image courtesy: oldcomputers.info

Supratim Sanyal's Blog: OpenBSD Logo
OpenBSD is among the few operating systems available today (along with the best O/S ever - Digital OpenVMS of course!) for the paranoid that can be the basis of installations requiring bullet-proof security. The official OpenBSD website says, "Only two remote holes in the default install, in a heck of a long time!". Given OpenBSD was released in 1995, the "heck of a long time" is 23 years. The first of the two holes was a OpenSSH vulnerability in 2002 that affected all operating systems using OpenSSH.. The second one, CVE-2007-1365 discovered eleven years ago, involved ICMP6 packets in OpenBSD's IPv6 implementation.

The versatile QEMU emulator project has matured enough to include stable emulation of the Sun-4U featuring SPARC V9 64-bit processor architecture. I took the opportunity to try out OpenBSD release 6.4 for SPARC64 using qemu-system-sparc64 hypervisor on OpenSUSE Tumbleweed running in a Oracle Virtualbox on CentOS 7 on a DELL PowerEdge R-710.

The OpenBSD installer ISO CD image (install64.iso)  was the fastest distribution download I have experienced yet, perhaps due to hosting on Cloudflare CDN.

A QEMU qcow2-format 4GB disk image was created using:

$ qemu-img create -f qcow2 -o size=4G openbsd-sparc-disk-1.4gb.disk

The downloaded install64.iso OpenBSD installer CD image was renamed for better identification to openbsd-sparc-install64.iso and QEMU SPARC-64 emulator fired up for installation:

LC_ALL=C QEMU_AUDIO_DRV=none \
qemu-system-sparc64 \
        -machine sun4u,usb=off \
        -realtime mlock=off \
        -smp 1,sockets=1,cores=1,threads=1 \
        -rtc base=utc \
        -m 1024 \
        -boot d \
        -drive file=openbsd-sparc-disk-1.4gb.disk,if=none,id=drive-ide0-0-1,format=qcow2,cache=none \
        -cdrom openbsd-sparc-install64.iso \
        -device ide-hd,bus=ide.0,unit=0,drive=drive-ide0-0-1,id=ide0-0-1 \
        -msg timestamp=on \
        -serial pty -nographic \
        -net nic,model=ne2k_pci -net user \
        -monitor stdio

"-boot d" boots the virtual Sun4U from the CD-ROM image. Also, "-net nic,model=ne2k_pci -net user" is the only QEMU networking model that works for the QEMU sparc64 hypervisor at this time; neither the tap nor the VDE (Virtual Distributed Ethernet) back-ends could establish network connection from the virtual machine successfully. The tap networking back-end caused a kernel panic and crashed the VM after a few pings went through to the internet. The VDE back-end did not cause a system crash, but did not provide a network connection at all either.  The two attempted and failed networking back-end parameters in the qemu command line were:

-net nic,model=ne2k_pci -net tap,ifname=inettap0,script=no,downscript=no
-net nic,model=ne2k_pci -net vde,sock=/tmp/vde-ip.ctl


QEMU launched successfully with the console connected to a virtual serial port that it identified:

QEMU 3.0.0 monitor - type 'help' for more information
(qemu) qemu-system-sparc64: -serial pty: char device redirected to /dev/pts/5 (label serial0)

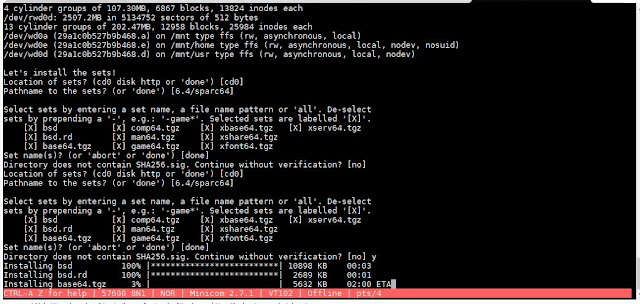
On another host (OpenSUSE) terminal, the "minicom" serial port communications tool was used to connect to the Sun4U virtual console serial port (/dev/pts/5 in the above example). The first screen of the installer was displayed after the virtual SPARCstation booted up:


Supratim Sanyal's Blog: IInstalling OpenBSD SPARC 64-bit for Sun UltraSPARC using QEMU in SANYALnet Labs - Installation Screen #1\

Installation proceeded with no surprises.

Supratim Sanyal's Blog: IInstalling OpenBSD SPARC 64-bit for Sun UltraSPARC using QEMU in SANYALnet Labs - Installation Screen #2

Supratim Sanyal's Blog: IInstalling OpenBSD SPARC 64-bit for Sun UltraSPARC using QEMU in SANYALnet Labs - Installation Screen #3

Eventually installation completed successfully. The machine was then halted and QEMU stopped by entering "quit" at the "(qemu)" prompt.


Supratim Sanyal's Blog: IInstalling OpenBSD SPARC 64-bit for Sun UltraSPARC using QEMU in SANYALnet Labs - Installation Screen #4

QEMU was then launched again, this time with "-boot c" option to boot from the hard disk instead of the CD-ROM image:

LC_ALL=C QEMU_AUDIO_DRV=none \
qemu-system-sparc64 \
        -machine sun4u,usb=off \
        -realtime mlock=off \
        -smp 1,sockets=1,cores=1,threads=1 \
        -rtc base=utc \
        -m 1024 \
        -boot c \
        -drive file=openbsd-sparc-disk-1.4gb.disk,if=none,id=drive-ide0-0-1,format=qcow2,cache=none \
        -cdrom openbsd-sparc-install64.iso \
        -device ide-hd,bus=ide.0,unit=0,drive=drive-ide0-0-1,id=ide0-0-1 \
        -msg timestamp=on \
        -serial pty -nographic \
        -net nic,model=ne2k_pci -net user \
        -monitor stdio

The virtual SPARCstation booted up finefrom the hard-disk. At the "root device:" prompt, the device "wd0a" was provided. The default for the swap and dump devices were chosen.

Supratim Sanyal's Blog: IInstalling OpenBSD SPARC 64-bit for Sun UltraSPARC using QEMU in SANYALnet Labs - Installation Screen #5

Supratim Sanyal's Blog: IInstalling OpenBSD SPARC 64-bit for Sun UltraSPARC using QEMU in SANYALnet Labs - Installation Screen #6

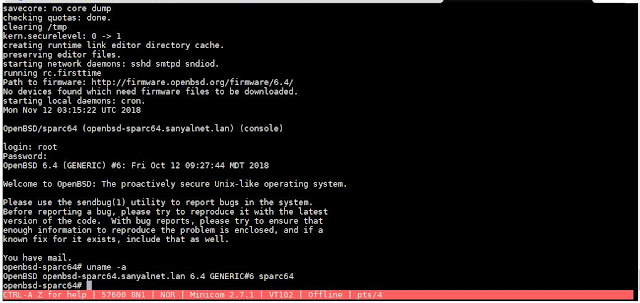
Eventually the logon prompt was displayed.

Supratim Sanyal's Blog: IInstalling OpenBSD SPARC 64-bit for Sun UltraSPARC using QEMU in SANYALnet Labs - Installation Screen #6

OpenBSD comes with C and C++ compilers. It also provides a graphical X Windows environment; it should be possible to set up routing so that the user-mode network back-end forwards X windows data to an external X server for the display (QEMU SPARC 64 emulator does not support graphics yet).

Supratim Sanyal's Blog: IInstalling OpenBSD SPARC 64-bit for Sun UltraSPARC using QEMU in SANYALnet Labs - Installation Screen #7

Supratim Sanyal's Blog: IInstalling OpenBSD SPARC 64-bit for Sun UltraSPARC using QEMU in SANYALnet Labs - Installation Screen #8

DOWNLOAD

The QEMU OpenBSD SPARC 64-bit virtual machine can be downloaded from my google drive. The root password of the virtual QEMU Sun4u is "password".


Wednesday, November 7, 2018

Adding a Couple of World's Biggest and Most Expensive Hard Drives: IBM 3390 DASD on S/390 Mainframe

IBM 3390 hard drives - direct access storage device
IBM 3390 direct access storage device
Picture courtesy: IBM


So I added a couple of the world's biggest and most expensive disk drives to IBM S/390 z/Architecture mainframe running Ubuntu 18 Linux. In real life, this would have set me back by almost half a million dollars in today's money. Fortunately, I actually spent $0.00 thanks to the rock-solid Hercules-emulated IBM S/390 running Ubuntu Linux 18.

Adding new storage to big-iron is a bit different from adding SCSI or IDE disks to more familiar computers! This post chronicles the steps.


On the host running Hercules, create the virtual disk image file using the dasdinit tool (part of Hercules); new DASD device with device-number 0122:

dasdinit -z -linux ./dasd/ubuntu-s390x.0122.disk 3390-3 0x0122 3200


Edit the Hercules configuration file and add the new dasd image filename for the new device number:

# .-----------------------Device number
# |     .-----------------Device type
# |     |       .---------File name and parameters
# |     |       |
# V     V       V
#---    ----    --------------------

# Display Terminals
0700 3270
0701 3270

# dasd
0120 3390 ./dasd/ubuntu-s390x.0120.disk
0121 3390 ./dasd/ubuntu-s390x.0121.disk
0122 3390 ./dasd/ubuntu-s390x.0122.disk


Then start Hercules and log into the emulated Ubuntu s390x as root.

Make sure Ububtu sees the new drive (although it is not available for use yet). Check for the device number in the output of the lszdev command:

root@s390x:~# lszdev
Reading device information: 100.0% (7/7)
TYPE         ID                 ON   PERS  NAMES
dasd-eckd    0.0.0120           yes  yes   dasda
dasd-eckd    0.0.0121           yes  yes   dasdb
dasd-eckd    0.0.0122           no   no
ctc          0.0.0a00:0.0.0a01  yes  yes   slca00
generic-ccw  0.0.0700           no   no
generic-ccw  0.0.0701           no   no

To activate the new  drive, use the chzdev command and verify with lszdev again:

root@s390x:~# chzdev -e 0122
ECKD DASD 0.0.0122 configured

root@s390x:~# lszdev
Reading device information: 100.0% (7/7)
TYPE         ID                 ON   PERS  NAMES
dasd-eckd    0.0.0120           yes  yes   dasda
dasd-eckd    0.0.0121           yes  yes   dasdb
dasd-eckd    0.0.0122           yes  yes   dasdc
ctc          0.0.0a00:0.0.0a01  yes  yes   slca00
generic-ccw  0.0.0700           no   no
generic-ccw  0.0.0701           no   no

Also use the lsdasd command to see the new drive in the list of drives:

root@s390x:~# lsdasd
Bus-ID     Status      Name      Device  Type  BlkSz  Size      Blocks
==============================================================================
0.0.0120   active      dasda     94:0    ECKD  4096   2347MB    601020
0.0.0121   active      dasdb     94:4    ECKD  4096   1125MB    288000
0.0.0122   active      dasdc     94:8    ECKD  4096   2250MB    576000

At this point, the new uninitialized drive is available with the Linux device name dasdc. As usual, we partition the drive, but using the special fdasd tools (not fdisk). For my case, I just created one big partition spanning the entire drive.

root@s390x:~# fdasd /dev/dasdc
reading volume label ..: VOL1
reading vtoc ..........: ok

Command action
   m   print this menu
   p   print the partition table
   n   add a new partition
   d   delete a partition
   l   list known partition types
   v   change volume serial
   t   change partition type
   r   re-create VTOC and delete all partitions
   u   re-create VTOC re-using existing partition sizes
   s   show mapping (partition number - data set name)
   q   quit without saving changes
   w   write table to disk and exit

Command (m for help): v
Please specify new volume serial (6 characters).
current     : 0X0122
new [0X0122]:

volume identifier changed to '0X0122'

Command (m for help): n
First track (1 track = 48 KByte) ([2]-47999):
Using default value 2
Last track or +size[c|k|m|g] (2-[47999]):
Using default value 47999

Command (m for help): p

Disk /dev/dasdc:
  cylinders ............: 3200
  tracks per cylinder ..: 15
  blocks per track .....: 12
  bytes per block ......: 4096
  volume label .........: VOL1
  volume serial ........: 0X0122
  max partitions .......: 3

 ------------------------------- tracks -------------------------------
               Device      start      end   length   Id  System
          /dev/dasdc1          2    47999    47998    1  Linux native

Command (m for help): w
writing volume label...
writing VTOC...
rereading partition table...


Now at last a familiar command to format the partition with ext4 file system:

root@s390x:~# mkfs.ext4 -t small /dev/dasdc1
mke2fs 1.44.1 (24-Mar-2018)
Creating filesystem with 575976 4k blocks and 576000 inodes
Filesystem UUID: a0010741-a0f4-4465-9629-6fd9a32a2bbc
Superblock backups stored on blocks:
        32768, 98304, 163840, 229376, 294912

Allocating group tables: done
Writing inode tables: done
Writing superblocks and filesystem accounting information: done

The new DASD volume is now ready for use, and can be mounted to a suitable mount-point, or for automatic mounting at boot, to /etc/fstab.

root@s390x:/# mount /dev/dasdc1 /mnt

Many thanks to Frank's post for these steps.

Sunday, October 21, 2018

Bionic Beaver on Z/Architecture: My Personal Mainframe IBM S/390 running Ubuntu 18 Linux on Hercules on OpenSUSE Tumbleweed

Supratim Sanyal's Blog: IBM S/390 Hercules Emulator Consoler running ubuntu linux on OpenSUSE tumbleweed on oracle virtual box in SANYALnet Labs
Hercules IBM Z/Architecture Mainframe Emulator Console

IBM S/390 Picture courtesy of The Computer Sheds
IBM S/390
Picture courtesy of The Computer Sheds
As a Digital alumnus with reverence for all things DEC, competitor IBM's big iron mainframes and operating systems have always been a curiosity. So far, my IBM experience has been with PC-DOS (here is a PC DOS 2000 based internet-facing web server), their incredible IBM OS/2 Warp, and recently IBM AIX on a virtual box.

Inspired by Astr0baby's blog post and Jeff Sipek's guide, I decided to install Ubuntu 18 "Bionic Beaver" Ubuntu 18.04.1 LTS (GNU/Linux 4.15.0-36-generic s390x) on a Hercules-emulated IBM S/390 Mainframe computer running on OpenSUSE Tumbleweed inside a Oracle VirtualBox appliance. This is the first mainframe-class machine emulated at SANYALnet Labs.

Hercules 4.0 Hyperion mainframe emulator was used for the guest S/390.  "Hercules is an open source software implementation of the mainframe System/370 and ESA/390 architectures, in addition to the latest 64-bit z/Architecture." - Hercules official web page.


OpenSUSE Packages

Packages installed in preparation of OpenSUSE Tumbleweed as the build and execution environment for Hercules hypervisor include the following. The standard zypper package management tool for OpenSUSE was used.

# zypper install bridge-utils uml-utilities tunctl net-tools-deprecated ipcalc git cmake vde2 libcap-progs libpcap-devel libpcap1 pcapdump pcapinfo
# zypper install -t pattern devel_C_C++


HOST NETWORK SETUP

OpenSUSE Tumbleweed; IP: 10.100.0.22/24
Guest: S/390, IP Address 10.100.0.23/24
Gateway: 10.100.0.1
DNS: 8.8.8.8 (google DNS)

OpenSUSE's firewall was interfering with the guest S/390s ability to resolve domain names via DNS and access the internet over HTTP(S), both during installation and post-installation of Ubuntu-18 for s390x.  For example, the following message was observed during Ubuntu s390x installation in the guest:

Supratim Sanyal's Blog: Ubuntu s390x Installer Error accessing Archive Mirrors over Internet
Ubuntu s390x Installer Error accessing Archive Mirrors over Internet
To get around this problem, the host (OpenSUSE) firewall daemon "firewalld" was disabled completely  and a startup script was added to flush and clear iptables rules at boot time.

# systemctl disable firewalld
# systemctl stop firewalld

OpenSUSE host network setup executable script at /root/netsetup/bridge-tap-vde-setup.sh:
-

-

The following was added to /etc/init.d/after.local to get the network setup script to execute at boot time:

#!/bin/bash
#
# --
# /etc/init.d/after.local
# --
touch /forcefsck
/root/netsetup/bridge-tap-vde-setup.sh > /tmp/bridge-tap-vde-setup.sh 2>&1
sync
exit 0

Also the after-local service was enabled for /etc/init.d/after.local script to execute at boot-time:

# systemctl enable after-local.service
# systemctl start after-local.service


IBM S/390 Mainframe in Hercules and Ubuntu 18 (s390x) installation

Supratim Sanyal's Blog: Hercules IBM S/390 z/arch emulator startup and CD-ROM boot command
Hercules startup and CD-ROM boot command


Astr0baby's instructions were followed for rest of the installation of Ubuntu 18 s390x on the guest. The full command to mount the downloaded distribution CD-ROM ISO image on OpenSUSE's /mnt directory is:

$ sudo mount -t iso9660 -o loop ubuntu-18.04.1-server-s390x.iso /mnt

The following hercules.cnf file was used:

-

-

Hercules had to be launched from OpenSUSE root account; even sudo from a user account did not work for letting Hercules access the tun adapter completely for networking. This is despite setting permissions on the /dev/net/tun, /use/local/bin/hercifc etc. as described in "Hercules Version 4: TCP/IP networking with Hercules".

Since any desired Ubuntu packages could be installed later, only the "SSH server" option was selected in addition to the Ubuntu base install in the installation software selection options screen.

The actual Ubuntu 18.04 s390x installation turned out to be uneventful. It followed a similar path to Ubuntu installation on x64. Automatic post-installation reboot did not work as Hercules stopped with halt when the guest operating system shut down for reboot. Exiting and relaunching the emulator and booting the guest operating system worked fine. Here is a video captured during the installation process:


Automatic boot-up of guest Ubuntu s390x on startup of Hercules hypervisor was achieved by creating a file "hercules.rc" in the same directory as "hercules.cnf" with a line containing the same command used at the Hercules prompt to boot manually:

ipl 120

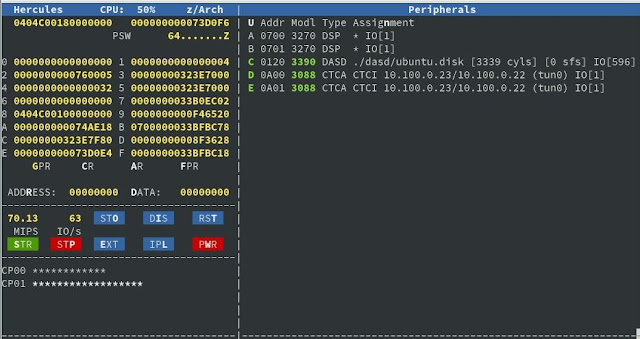
Pressing ESC in the Hercules console screen toggles between a "graphical" view of the S/390 showing processor registers, the processor status word/flags, CPU usage, disk and network I/O etc. as in the example at the top of this post.

Anything typed in starting with a period at the Hercules console's "herc ====>" prompt is sent on to the virtual guest directly (i.e. not processed by the emulator itself). Therefore, even if SSH access to the Ubuntu s390x guest is unavailable, it is possible to login to Ubuntu s390x by entering .username and .password starting with a period (i.e. a dot) at the beginning on the Hercules console, and execute Linux commands by typing them in starting with dots the same way.

It is exciting to be able to run a mainframe version of Ubuntu as a hobbyist system!

-

-

Download

You can download free snippets of the experiment's session logs from my google drive. In addition. here are some random images of screenshots taken during having all this fun!


Saturday, October 6, 2018

Pandora FMS and eHorus - a great integrated network monitoring and SaaS cloud-based remote management system

Supratim Sanyal's Blog: eHorus integration with Pandora FMS at SANYALnet Labs
eHorus integration in Pandora FMS web interface (Processes vie)

After playing around with the usual network monitoring tools, all of them impressive (Nagios, PRTG, Zabbix, Zenoss), I have settled down on Pandora FMS for a few years to monitor hobbyist servers in SANYALnet Labs. With solid agent-based real-time performance monitoring and alarming capabilities and an impressive "recon" task with automatic network hierarchy discovery and visual network mapping features, Pandora FMS has been serving me very well.

After a recent upgrade to the latest Pandora FMS distribution, I discovered it supports seamless integration with the eHorus cloud-based remote management system (SaaS) for total command and control of my network nodes right from inside the Padora FMS web interface as well as the eHorus portal internet web-site.

The steps to deploy eHorus and the required registration form and agent downloads are described pretty well at the eHorus web-site. The free tier allows up to 10 nodes and one concurrent user - quite enough for a hobbyist environment like mine.

I started off by registering an account at the eHorus portal and installing the CentOS 7 64-bit eHorus agent on my Dell PowerEdge R710 virtualization host that runs a bunch of SANYALnet Labs hobbyist nodes.

downloaded and installed the eHorus agent for 64-bit CentOS 7 following these instructions.The only change I made to the /etc/ehorus/ehorus_agent.conf file is to substitute my real eHorus userid in the "#eh_user USER" parameter in the config file.


I then enabled and started the ehorus_agent_daemon using the systemctl command.

# systemctl enable  ehorus_agent_daemon
# systemctl start ehorus_agent_daemon
# systemctl status  ehorus_agent_daemon
● ehorus_agent_daemon.service - LSB: eHorus Agent startup script
   Loaded: loaded (/etc/rc.d/init.d/ehorus_agent_daemon; bad; vendor preset: disabled)
   Active: active (running) since Fri 2018-10-05 23:55:20 UTC; 2h 13min ago
     Docs: man:systemd-sysv-generator(8)
   CGroup: /system.slice/ehorus_agent_daemon.service
           └─20940 /usr/bin/ehorus_agent -f /etc/ehorus/ehorus_agent.conf

Oct 05 23:55:18 dell-poweredge-r710.sanyalnet.lan systemd[1]: Starting LSB: eHorus Agent startup script...
Oct 05 23:55:19 dell-poweredge-r710.sanyalnet.lan ehorus_agent_daemon[20908]: 2018-10-05 23:55:19 [log][2] WARNING: no pas...t!
Oct 05 23:55:20 dell-poweredge-r710.sanyalnet.lan ehorus_agent_daemon[20908]: eHorus Agent is now running with PID 20940
Oct 05 23:55:20 dell-poweredge-r710.sanyalnet.lan systemd[1]: Started LSB: eHorus Agent startup script.
Hint: Some lines were ellipsized, use -l to show in full.


Checking the eHorus web portal, I could now see my server:

Supratim Sanyal's Blog: eHorus Portal (SANYALnet Labs)
eHorus Portal (internet web site) with one server

eHorus provides the following options for command and control of configured servers:

  • Terminal
  • Desktop,
  • Processes
  • Services
  • Files.


Supratim Sanyal's Blog: eHorus Details Screen (SANYALnet Labs)
eHorus Node Details Screen at Web Portal

eHorus integrates with Pandora FMS enabling seamless monitoring and control facilities for nodes from right inside the Pandora FMS web UI. Here is an example of a eHorus terminal window inside a Pandora FMS web session:

Supratim Sanyal's Blog: eHorus Details Screen (SANYALnet Labs)
 eHorus terminal inside Pandora FMS
I will gradually deploy eHorus remote management agents on some of my other nodes. Unfortunately, the eHorus agent is not available for OpenVMS VAX or Alpha, Solaris, AIX, NetBSD and similar unusual operating systems that I play around with.

Recommended Products from Amazon