Search

Tuesday, April 23, 2019

Portable Retrogaming: Building a handheld RetroPie with Raspberry Pi 3B+, battery pack and USB speaker to play 55000 games on 30 classic game consoles


My son and I built this contraption that will probably be difficult to explain to the TSA agents at airports. A Raspberry Pi 3B+ with the official 7" touch-screen in a case, it draws power from a common 5V powerpack used by folks as backup mobile chargers and plays audio using a mini USB speaker.

We recharge it by charging the power-pack using a regular charger adapter with a micro-USB connector. It takes about 16 hours to charge fully, and the system runs for around 10 hours on one full charge of the particular power-pack we used.

Here is the parts list. You can click on each to see the item on Amazon.


  1. Element14 Raspberry Pi 3 B+ Motherboard (Made in UK)
  2. Raspberry Pi 3 B+ (B Plus) Display Kit Set Including 7-inch Touchscreen, Power Supply and Official Case
  3. Anker PowerCore 10000 Portable Rechargeable Battery Power-Pack
  4. HONKYOB USB Mini Speaker Computer Speaker Powered Stereo Multimedia Speaker
  5. MicroUSB Push On Off Power Switch Cable for Raspberry Pi (Female to Male)
In addition, we used
  1. a precision screwdriver set
  2. an electric drill to drill small holes on the official case
  3. some thin nylon cord rope to tie the power-pack to the back of the case using the drilled holes (see pictures below)
  4.  heavy-duty dual-sided mounting tape to hold the USB mini-speaker at the back of the case

Here is a video on the construction of our portable RetroPie hand-held gaming console built using the Raspberry Pi 3B+ and powered by the rechargeable attached battery pack with stereo sound via the USB speaker, featuring 30 classic game consoles and over 55000 games.


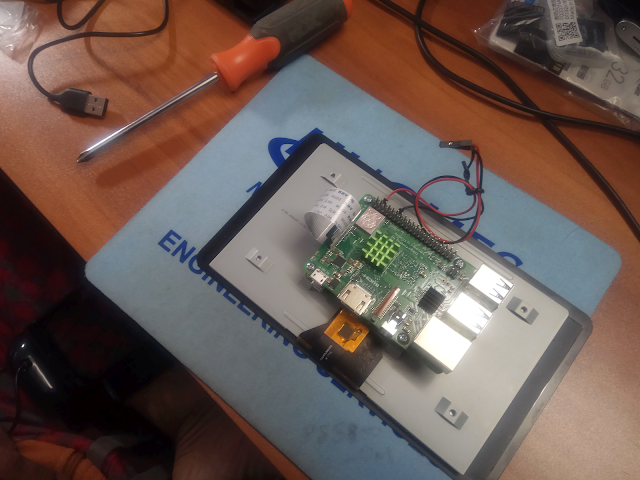
We first bolted the Raspberry Pi 3B+ to the back of the 7" touchscreen.

SANYALnet Labs: Portable RetroPi - Raspberry Pi Touchscreen Connection


SANYALnet Labs: Portable RetroPi - Raspberry Pi Touchscreen Connection - Step 2

We attached the ribbon cable running from the touchscreen to the display port of the Raspberry Pi.


SANYALnet Labs: Portable RetroPi - Raspberry Pi Touchscreen Connection - Step 3

SANYALnet Labs: Portable RetroPi - Raspberry Pi Touchscreen Connection - Step 4


SANYALnet Labs: Portable RetroPi - Raspberry Pi Touchscreen Connection - Step 6

The last step of connecting the touchscreen to the Raspberry Pi was to connect the red and black power connectors to pin 4 (+5V) and pin 6 (GND) respectively. For Raspberry Pi 3B+, it is not required to connect the other two cables that come with the touchscreen to the Pi - connecting them actually degrades the video.

Raspberry Pi GPIO Pins


SANYALnet Labs: Portable RetroPi - Raspberry Pi Touchscreen Connection - Step 7

SANYALnet Labs: Portable RetroPi - Raspberry Pi Touchscreen Connection - Step 8

SANYALnet Labs: Portable RetroPi - Raspberry Pi Touchscreen Connection - Step 9

The basic setup done, we then put the back of the case in, piggy-backed the rechargeable battery power-pack for the Raspberry Pi and Touchscreen, and attached the USB mini-speaker using double-sided tape as you can see in the video.

Correcting Raspberry Pi Inverted Touchscreen

We hit the famous inverted touch-screen (display orientation) issue, of course. Editing the /boot/config.txt file and adding the following line, and rebooting, fixed it.

lcd_rotate=2


Enabling USB Audio

To get the Raspberry Pi / Raspbian based RetroPi operating system to play sound on the powered USB mini speaker, we edited the /usr/share/alsa/alsa.conf file and changed the following parameters from 0 to 1:

defaults.ctl.card 1
defaults.pcm.card 1

Screen Brightness Control

The screen brightness defaults to 100% which is good for outdoors in the sun, but drains the battery fast. The brightness can be controlled by adjusting the value of the runtime system parameter byte  /sys/class/backlight/rpi_backlight/brightness. It takes a value from 0 to 255.  We use a simple shell script below to adjust the brightness.

root@retropie:~# cat setbrightness.sh
#!/bin/bash

if [ $# != 1 ]; then
        echo "Usage: $0 30-255"
        exit 1
fi

level=$1

if [[ $level -ge 30 && $level -le 255 ]]; then
        echo $level > /sys/class/backlight/rpi_backlight/brightness
        echo "Brightness set to $level"
        exit 0
else
        echo "Error - level out of range"
        echo "Usage: $0 30-255"
        exit 1
fi


We then got heat-sinks to keep it all cool! This meant opening everything up again. Here are another set of pictures from heat-sink installation.

SANYALnet Labs: How to build a battery-powered portable RetroPi using Raspberry Pi

SANYALnet Labs: How to build a battery-powered portable RetroPi using Raspberry Pi

SANYALnet Labs: How to build a battery-powered portable RetroPi using Raspberry Pi

SANYALnet Labs: How to build a battery-powered portable RetroPi using Raspberry Pi

SANYALnet Labs: How to build a battery-powered portable RetroPi using Raspberry Pi

SANYALnet Labs: How to build a battery-powered portable RetroPi using Raspberry Pi

SANYALnet Labs: How to build a battery-powered portable RetroPi using Raspberry Pi

SANYALnet Labs: How to build a battery-powered portable RetroPi using Raspberry Pi

Monday, April 1, 2019

Setting up a MULTINET TCP connection (DECnet over IP)

Supratim Sanyal's Blog: MULTINET TCP Tunnel - OpenVMS VAX Server DECnet over TCP/IP Link


Here is an example of a MULTINET:DECNET-CIRCUITS.COM file for Process Software's MULTINET TCP/IP for OpenVMS. This sets up a TCP connection to another MULTINET end-point for DECnet traffic to be tunneled under TCP/IP.

The "MULTINET CONFIGURE /DECNET" command seems to allow only UDP connections to be configured; if so, MULTINET:DECNET-CIRCUITS.COM needs to be hand-edited for the connections to be based on TCP instead of UDP.

Specifically, after using the normal configuration utility to set up a default UDP connection, the "multinet set /decnet" line in MULTINET:DECNET-CIRCUITS.COM has to be modified manually to use TCP. This is borne out by the relevant section from MultiNet DCL Command Reference which states that the "/TCP" switch is not supported by the normal configuration utility:

MULTINET SET /DECNETConfigures the DECnet TCPAx: devices for running DECnet-over-UDP circuits.
QUALIFIERS
/BUFFERS=buffercount
Specifies the number of buffers the driver preallocates for this device (by default, 6).
/CLOSE
Shuts down and deletes a socket created with the socket() routine. After issuing a CLOSE command, the socket cannot be used again until the MULTINET SET/DECNET command is reissued.
/CONNECT
Issues a connect() call to bind the remote address of the socket to the address specified in /REMOTE_ADDRESS.
/DEVICE=device
Specifies the DECnet device name (by default, TCPA0:).
/FILTER_OUT_OF_ORDER=AUTOMATIC (default)
/FILTER_OUT_OF_ORDER=OFF
/FILTER_OUT_OF_ORDER=ON
Controls the handling of out-of-order DECnet packets arriving via IP. Prior to VMS V4.7, DECnet could not handle packets arriving out-of-order and would drop the line if it received them. If you have any VMS V4.6 or earlier systems in your DECnet network with which you are communicating, you must use the /FILTER_OUT_OF_ORDER=ON qualifier. The default action,
/FILTER_OUT_OF_ORDER=AUTOMATIC, selects the correct filtering based on the VMS version of the current system only.
/LOGDATA
Specifies that send() and recv() log a sample of the data passed through them to OPCOM. Use this qualifier only for debugging network problems.
/LOGERRORS
Specifies that send() and recv() errors are logged to OPCOM. The default is to log all errors except these.
/PORT=UDP-port-number
Specifies the UDP port number to use for communication (by default, 700).
/REMOTE_ADDRESS=ip-address
Specifies the peer's IP address.
/TCP=mode
/TCP=CONNECT
/TCP=LISTEN
Specifies that DECnet is encapsulated in TCP instead of UDP. This mode is not supported by the normal configuration utility, but is of use over high-loss lines. LISTEN specifies that this end of the connection listens on the specified port; CONNECT specifies that this end attempts to connect to the listener on the specified port.
The MULTINET:DECNET-CIRCUITS.COM file below is from an actual SIMH MicroVAX 3900 running OpenVMS 7.3 and MULTINET version:

$ multinet show/version
Process Software MultiNet 5.5 Rev A, VAXserver 3900 Series, OpenVMS VAX V7.3


Deploying the Single Greatest Piece of Software Ever: BSD 4.3 on VAX

Supratim Sanyal's Blog: Installing 4.3 BSD Unix Quasijarus on VAX (SIMH MicroVAX 3900 BSD 4.3)
4.3 BSD Unix Quasijarus on VAX

It was great fun bringing up 4.3 BSD Quasijarus UNIX on a SIMH emulated VAX by simply following awesome instructions documented painstakingly by others. The web pages I found very useful include:
 4.3BSD is, of course, "The single Greatest Piece of Software Ever, with the broadest impact on the world". Legions of excited computer enthusiasts still trace almost every tool they use even today to 4.3BSD, including the vi editor to network programming using Berkeley sockets. Linux, for all it's popularity, continues to be an implementation of ideas first seen in BSD 4.3 UNIX.

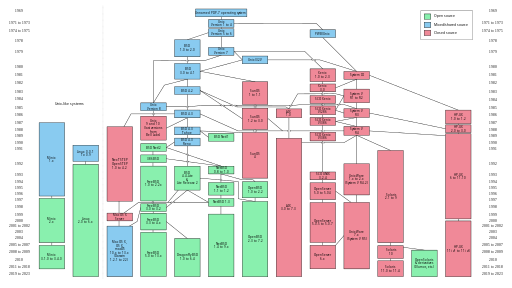
AIX, Solaris, MacOS X (and therefore iOS and watchOS), HP-UX, DEC Ultrix, Tru64 ... all are descendants in some form of BSD. Here is a diagram depicting a simplified evolution of UNIX from the Wikipedia page on Berkeley Software Distribution.

Unix history-simple


Recommended Products from Amazon