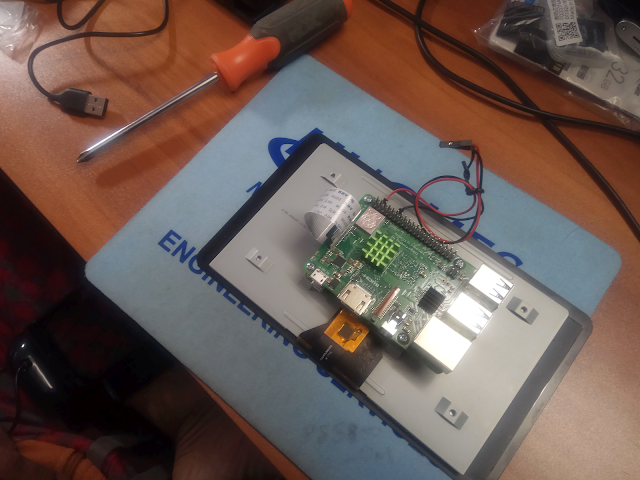
My son and I built this contraption that will probably be difficult to explain to the TSA agents at airports. A Raspberry Pi 3B+ with the official 7" touch-screen in a case, it draws power from a common 5V powerpack used by folks as backup mobile chargers and plays audio using a mini USB speaker.
We recharge it by charging the power-pack using a regular charger adapter with a micro-USB connector. It takes about 16 hours to charge fully, and the system runs for around 10 hours on one full charge of the particular power-pack we used.
Here is the parts list. You can click on each to see the item on Amazon.
- Element14 Raspberry Pi 3 B+ Motherboard (Made in UK)
- Raspberry Pi 3 B+ (B Plus) Display Kit Set Including 7-inch Touchscreen, Power Supply and Official Case
- Anker PowerCore 10000 Portable Rechargeable Battery Power-Pack
- HONKYOB USB Mini Speaker Computer Speaker Powered Stereo Multimedia Speaker
- MicroUSB Push On Off Power Switch Cable for Raspberry Pi (Female to Male)

In addition, we used
- a precision screwdriver set
- an electric drill to drill small holes on the official case
- some thin nylon cord rope to tie the power-pack to the back of the case using the drilled holes (see pictures below)
- heavy-duty dual-sided mounting tape to hold the USB mini-speaker at the back of the case
Here is a video on the construction of our portable RetroPie hand-held gaming console built using the Raspberry Pi 3B+ and powered by the rechargeable attached battery pack with stereo sound via the USB speaker, featuring 30 classic game consoles and over 55000 games.
We first bolted the Raspberry Pi 3B+ to the back of the 7" touchscreen.
We attached the ribbon cable running from the touchscreen to the display port of the Raspberry Pi.
The last step of connecting the touchscreen to the Raspberry Pi was to connect the red and black power connectors to pin 4 (+5V) and pin 6 (GND) respectively. For Raspberry Pi 3B+, it is not required to connect the other two cables that come with the touchscreen to the Pi - connecting them actually degrades the video.
The basic setup done, we then put the back of the case in, piggy-backed the rechargeable battery power-pack for the Raspberry Pi and Touchscreen, and attached the USB mini-speaker using double-sided tape as you can see in the video.
Correcting Raspberry Pi Inverted Touchscreen
We hit the famous inverted touch-screen (display orientation) issue, of course. Editing the /boot/config.txt file and adding the following line, and rebooting, fixed it.lcd_rotate=2
Enabling USB Audio
To get the Raspberry Pi / Raspbian based RetroPi operating system to play sound on the powered USB mini speaker, we edited the /usr/share/alsa/alsa.conf file and changed the following parameters from 0 to 1:defaults.ctl.card 1
defaults.pcm.card 1
Screen Brightness Control
The screen brightness defaults to 100% which is good for outdoors in the sun, but drains the battery fast. The brightness can be controlled by adjusting the value of the runtime system parameter byte /sys/class/backlight/rpi_backlight/brightness. It takes a value from 0 to 255. We use a simple shell script below to adjust the brightness.
root@retropie:~# cat setbrightness.sh
#!/bin/bash
if [ $# != 1 ]; then
echo "Usage: $0 30-255"
exit 1
fi
level=$1
if [[ $level -ge 30 && $level -le 255 ]]; then
echo $level > /sys/class/backlight/rpi_backlight/brightness
echo "Brightness set to $level"
exit 0
else
echo "Error - level out of range"
echo "Usage: $0 30-255"
exit 1
fi


No comments:
Post a Comment
"SEO" link builders: move on, your spam link will not get posted.
Note: Only a member of this blog may post a comment.